As the trend of working at home takes on the stage, more and more people prefer to work at home to save time and improve efficiency. While having meetings or conferences online, we need to share what's on the screen so we can be better understood.
Sometimes, we need to share content on our iPad or iPhone device, but the fact is that they don't have the built-in screen sharing function. So we need to use a third-party tool to achieve this goal. Join.me is a perfect app that we can use to share screens on iPhones and iPad. But due to different system versions, the operation steps are different. Now, look at the specific steps.
Share Screen on iOS 12 with join.me App
Share Screen on iOS 11 with join.me App
Share Screen on Older iOS Version by Mirroring to Mac
Share Screen on iOS 12 with join.me App
If your iPad or iPhone belongs to the iOS 12 system, you should look at the following guide to share screens.
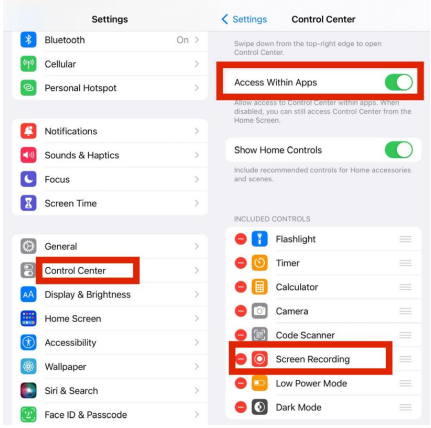
Note: Before sharing, the screen recording function is enabled on your device.
Setting > "Control Center" > check "Access Within Apps" > Find "Screen Recording" in the "More Controls" > select green add icon.
You can also read: How to Screen Record FaceTime with Audio on iPhone/Mac
Step 1: Download the Join.me APP on your iPad or iPhone and sign in to your account. Visit Site
Step 2: Start a meeting in the Join.me app.
Step 3: Click the "Tap here to share your screen now" button, and you can see a screen recording notification.
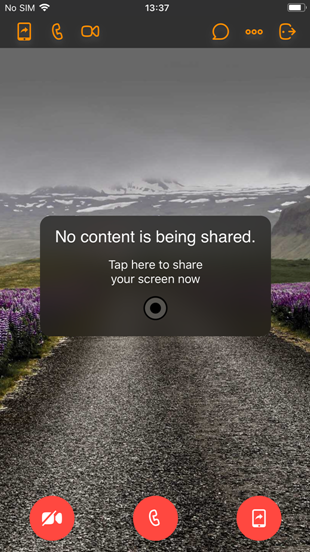
Step 4: Choose the "join.me" in the screen recording notification, then click the "Start Broadcast" button.
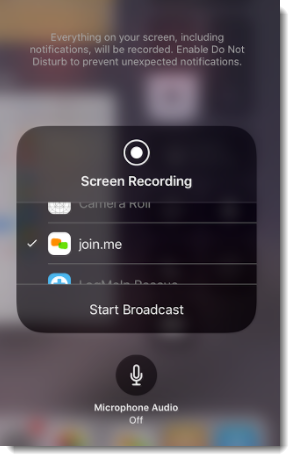
Note: Even though the screen recording function is enabled, it won't record anything unless you open the function in the join.me App.
Step 5: Tap anywhere on the screen to go back to the join.me meeting. Then, all the conference participants will see the screen you are sharing.
Step 6: When the meeting finishes, you can tap the share button on the button-right corner and select stop sharing.
Share Screen on iOS 11 with join.me App
The iOS 11 is a little different from iOS 12 regarding screen sharing.
Step 1: Add the "Screen Recording" to the home. (Refer to Note in the above instruction)
Step 2: Long-press the Screen Recording button and choose the "join.me" option. Click "Start Broadcast" to share your screen.
Note: Even though the screen recording function is enabled, it won't record anything unless you open the function in the join.me App.
Step 3: You need to wait for 3 seconds before the other participants can see your screen.
Share Screen on Older iOS Version by Mirroring to Mac
For that iPad and iPhone that belongs to the older iOS version, you could try to share the screen by mirroring them to a Mac PC. In this way, you don't need any third-party app, and the operation is straightforward.
Note: The minimum operating system requirement is Yosemite Mac OS X and iOS 8 on your iPhone or iPad.
Step 1: Connect your iPad or iPhone to your Mac by a USB cable.
Step 2: Launch QuickTime Player on Mac. Then select "File" > "New Movie Recording".
Step 3: You should choose your iPhone or iPad as camera in the Record menu.
Step 4: Launch your join.me app, and start a meeting. You can share your screen or the QuickTime Player as a window.
Final words
The methods are different due to different system versions. You could try the corresponding way according to your devices. If possible, you can use FaceTime or other apps with this function. I hope the article will assist you to share your iPad or iPhone screen effectively.
You can also read: How to Share Screen in FaceTime on iPhone/iPad/Mac