A watermark is used for a variety of purposes. To begin with, it can make your photos more difficult to steal or less desirable to hackers. Watermarks can also help you promote your work by marking your image with a logo that is immediately identifiable as yours. While anyone who truly wants to steal your pictures will do it with or without a watermark, you may wish to include one to make the process more difficult. This means that both honest people and lazy thieves will respect your effort. On the other side, thieves who choose to exploit your watermarked work will provide you with free advertising before you ask them to remove your shot.
In this article, you will find different applications, online tools, and software with a step-by-step guide on how to add watermark to photos on Windows, Mac, and online.
How to Add Watermark to Photos on Windows
Method 1. Apowersoft Watermark Remover
You can rely on Apowersoft Watermark Remover if you want to use a desktop tool for photo editing, specifically to watermark. It is a desktop application that allows users to add a watermark to photos using simple functionality.
Key Features:
- It is compatible with almost all photo formats.
- You can choose from a range of different fonts and colors to include in your watermark.
- Your watermarked photo will be saved in the original quality.
Price: It costs $25.00/Monthly, $39.00/Annual, and $59.00/Lifetime.
Compatibility: Windows
Step 1. Import photos from the gallery with a watermark

Step 2. Press the “re-add text” button from the up-right corner of the screen, and you can customize the size, color, and font

Step 3. Moreover, you can add an image as a watermark. Click “Re-add image” from the up-right corner and add the image

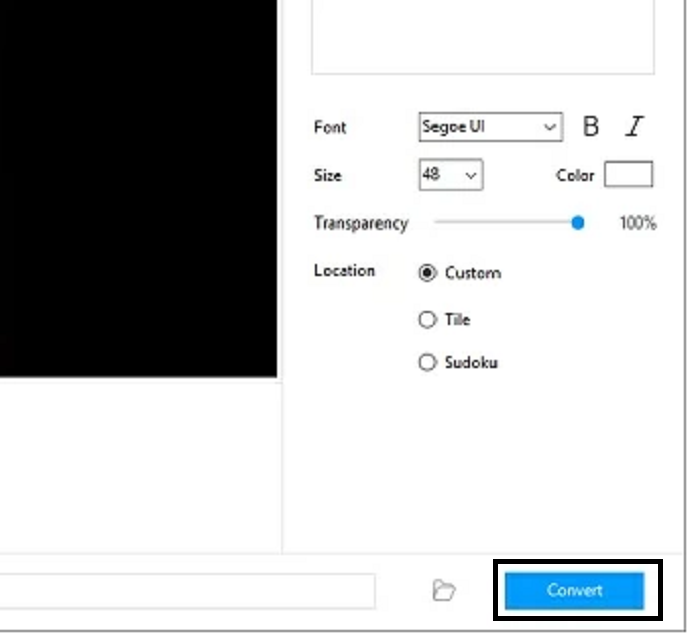
Step 4. After adjusting, press “convert” to get the photo with the watermark.

Method 2. Visual Watermark
A visual watermark is a tool you can install on your PCs and add watermark in photos to ensure privacy and confidentiality. Visual watermark adjusts the watermark font and color, and the preview dialog allows you to adjust the watermark position for every image in the batch.
Step 1. Browse the image to add a watermark

Step 2. Press “Add Logo” and browse watermark from your PC by selecting “choose a logo from gallery” from the drop-down menu

Step 3. Select watermark

Step 4.Adjust the watermark accordingly and add text to your image.

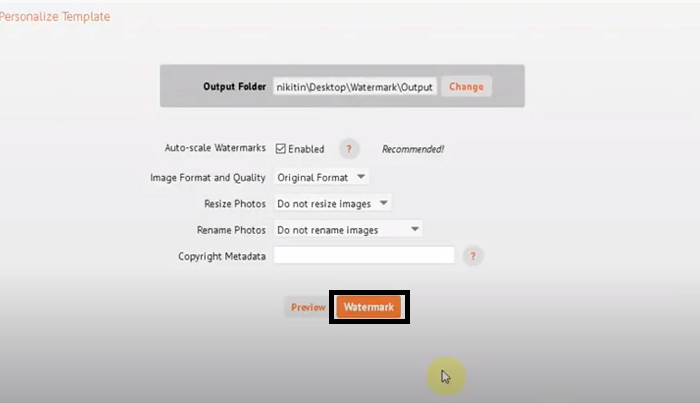
Step 5.Press “Watermark” and save it.

How to Add Watermark to Photos on Mac
Preview
On Mac, you don't need Photoshop or any other image editing software to add a watermark to an image quickly. To add your company name or copyright information to a photo, use the built-in Preview application. Place your watermark in a text field and adjust the colorand opacity to match the image. A 10% uncertainty is usually able to generate a new watermark without erasing the image behind it. Follow the instructions given below:
Step 1. Open the image in Preview on Mac

Step 2. Go to tools; press Annotate and select the "Text" option from the menu.

Step 3. Type the watermark and adjust the font, then save it.

How to Add Watermark to Photos on iOS
Method 1. Lightroom
Adobe Lightroom is a powerful photo-editing app that lets you add filters, adjust light settings like precision, contrast, shadows, and use a number of color-mixing and grading features.
Use the instructions below to add a watermark with Lightroom.
Step 1.After downloading the app, import the image to add a watermark

Step 2. Press the export icon

Step 3. Click the "export as" button

Step 4. Turn on the watermark.

Step 5. Adjust the size, color, and font of the watermark.

Step 6. Press tick and save the image with a watermark

Method 2. Watermark Photo
Watermark Photo offers several unique options to help you create a stylish watermark that you can use on your photos. The app is free to download and use, with premium features available for $39.99 annually. It allows you to watermark both a single photo and multiple ones. Here's how to add watermark on photos.
Step 1. Open the watermark photo application and select the project as a single watermark photo

Step 2. Press "text"

Step 3. Type the watermark and adjust the setting.

Step 4. Now press the tick from the top right corner and save the photo with a watermark in your photo library.

How to Add Watermark to Photos on Android
Method 1. Snapseed
Snapseed has evolved into a sophisticated picture editor for Android, and there are various reasons why it is so popular. In a matter of minutes, you can improve images with one-touch tools, tweak images with sliders, get double exposure effects, add filters, apply exciting text effects, and give pictures a whole new look. One such feature is the ability to add watermarks to photos straight. Follow the steps to add watermark to photos.
Step 1. Import the photo from the gallery and click the tools.

Step 2. Click “text” to add a watermark

Step 3. Edit watermark

Step 4. Press tick after editing the watermark.

Step 5. Press “ export” and click “save” to save the new image in your gallery

Method 2. Add Watermark on Photos
Add Watermark on Photos is the perfect application for you if you want an app with many fancy features that allow you to produce a creative watermark. This tool not only allows you to create watermarks for images, but also it can create watermarks for videos. There are numerous functions and editing tools available. Furthermore, the app includes a simple user interface with easy-to-use functionality. Follow these steps if you don't know how to add Watermark to images on Android.
Step 1. Open the app and select what you want.

Step 2. Press the image icon to add the image.

Step 3. Click the "text" icon to add Watermark.

Step 4. Edit the size of the Watermark, then click tick from the upright side of the corner.

How to Add Watermark to Photos Online
Method 1. Watermark
A watermark is a web-based tool that is very helpful in adding watermark to your photos, videos, and animated GIFs. This tool includes a straightforward interface with easy-to-use functionalities. Follow these easy steps if you want to add a watermark to photos.
Step 1.Go to the official website and upload a photo.

Step 2. Press “edit selected” to add a watermark.

Step 3. Press “watermark” and apply. Moreover, you can edit it.

Step 4. Click “apply” and save the new photo with a watermark

Method 2. Watermark
Watermarkly can process many images at the same time. If some of your photos are bigger or smaller than others, the watermark size will adjust instantly to match them better. It is an online tool but it offers a desktop program for Windows and Mac that can watermark hundreds of photos. It can process up to 50,000 images simultaneously and analyze them in parallel. Follow the step-by-guide on how to add watermark on photos.
Step 1. Open the tool, from the system and upload it.

Step 2. Press “Next step” to proceed.

Step 3. Click “Add text.”

Step 4. Edit the watermark.

Step 5. Click “Next Step” to save.

Step 6. If you want to preview it, you can click on the “preview,” and if you directly want to save the new file, then press “watermark image.”

Step 7. Click “download all” to download a new image with a watermark.

The Bottom Line
To summarize the entire article, we've explained why watermarks are essential to add to photos and how to add watermark on photos on Windows, Mac, Android, iOS, and online using different methods. One of the best tools, Apowersoft watermark remover, is simple to use with a friendly interface. Apowersoft watermark remover doesn't add or remove but also professionally edits the watermark. You can check it out yourself!
Price: It costs $25.00/Monthly, $39.00/Annual, and $59.00/Lifetime.
Compatibility: Windows


