There are several occasions where you may feel the need for screen recording in Windows 10, be it an essential lesson on performing a task or a new technique you can use in your gaming strategy. Sometimes you may also need something quick and straightforward to help you create a presentation, make a video tutorial, or record an issue that needs to be urgently sent to tech support.
This guide presents two simple ways Windows users can carry out the screen recording task. First, you can do it with the help of the native screen recorder app that comes in-built with your Windows 10, or go for a third-party app that can help you with it.
2 Simple Ways to Record Screen in Windows 10
Method 1: Record Screen in Windows 10 With Built-in Game Bar
You can use the Xbox Game Bar for screen recording in Windows 10 with the help of the keyboard and a screen reader.
The Xbox Game Bar can be a viable option for users who wish to record a video clip of their favorite game or app, particularly if they find an issue with usability. They can then easily share the problems with a developer using the screen recording in Windows 10 facility.
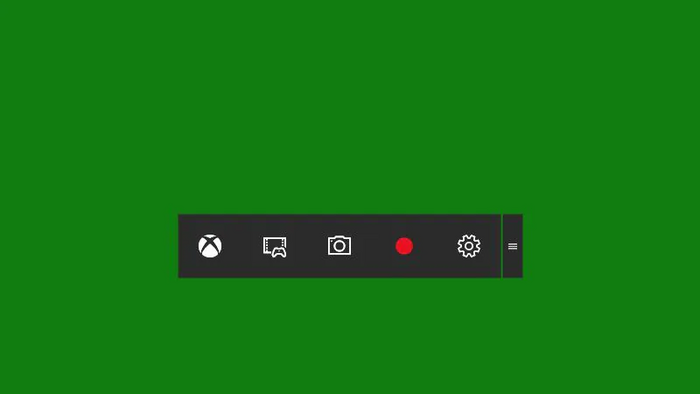
The Xbox Game Bar is a hidden built-in screen recording software in Windows 10. This relatively new video recording tool is free for use and comes installed by default in your Windows 10 operating system. All Windows 10 users can access it to record gameplay, and it also offers some rich features to make a dedicated video.
![]() Pros
Pros
- It is effortless to use and very handy
- It comes free with Windows 10, so you do not need to install any additional application to use this feature
- It gives you the option to pre-set record time and length of the video
![]() Cons
Cons
- You can use this facility to record only for a maximum of 2 hours
- There is no way of capturing mouse movements here, which limits your possibilities of creating
- interactive tutorials
Step-by-step guide
Step 1: For first-time users of the Xbox app, there are some basic settings that you need to take care of on your system. For example, you must open the Start Menu on your device, go to the All App option, and select Xbox.
Step 2: Once your Xbox application setup is complete, you can directly go inside any desired program or application in the Game Bar with the help of the shortcut keys Win+G. Once the Game Bar opens on your system for the very first time, you will find a pop-up window appear on your screen that will ask you if you wish to open the Game Bar or not. Select the Yes option.
Step 3: Start the recording process by hitting the red button on the screen. However, remember that this facility does not include the recording of mouse movements or the entire screen of your system.
Step 4: If you wish to stop recording, simply press Win+G.
Step 5: You can find the new video within the Xbox application. It would help if you pressed the Xbox button > Xbox application > Game DVR that contains the list of all recorded clips where you can also rename or edit any clip of your choice.
Step 6: There is also an option to change settings from the Game Bar window. For example, you can set the recording time and the length of video clips from the game bar setting icon with the help of a few keyword shortcuts.
Method 2: Record Screen in Windows 10 With RecExperts (Recommended)
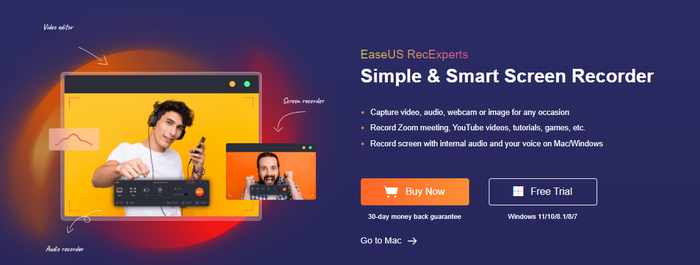
You can also use the EaseUS RecExperts software for screen recording in Windows 10 to enjoy various features and advantages.
The EaseUS RecExperts software is convenient, particularly during the pandemic when online video conferences have become a regular feature. If you do not wish to miss out on critical online meetings or video calls, you can use this screen recorder to freely record Skype calls, WhatsApp Call, Teams meeting, webinar, or Zoom meetings without permission.
EaseUS RecExperts is a simple and intelligent screen recorder that can help you capture video, audio, webcam, or image and record Zoom meeting, YouTube videos, tutorials, games, etc. It lets you record the screen with internal audio and your voice on Windows 10. With EaseUS RecExperts, you can record part or full screen according to your choice and needs. It can be a screenshot tool to take snapshots from your PC screen, even when recording.
![]() Pros
Pros
- It is simple and comes with a user-friendly interface
- It comes with an auto stop and auto split option
- You can schedule automatic recording as well as various other tasks
- It gives the option of editing your recording and adding customized intros
![]() Cons
Cons
- To enjoy the maximum benefits of this tool, you need to go for the paid version
Price: It starts $19.95/Monthly.
Compatibility: Windows and Mac
Step-by-step guide
Step 1. Run EaseUS RecExperts on your Windows. If you want to capture everything on your screen, click the "Full Screen" option. This is a perfect choice when playing the streaming video in full-screen mode.
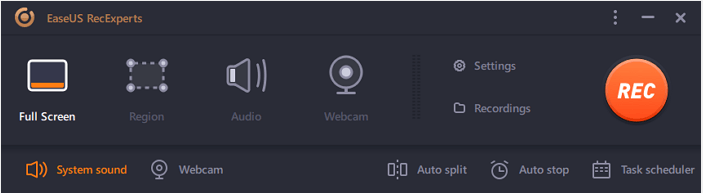
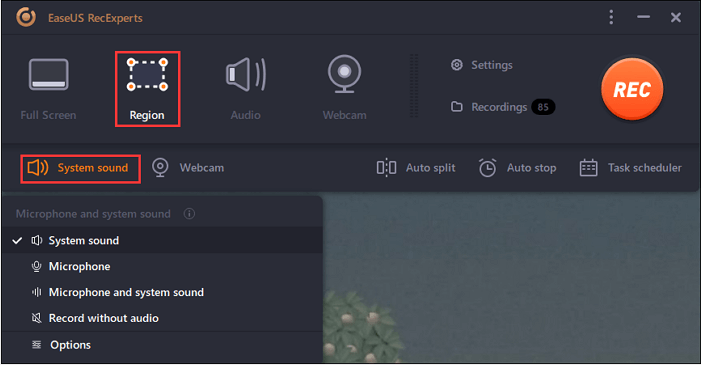
Step 2. Alternatively, you can opt for "Region" to record the specific area if you want to play the streaming video in a window.

Step 3. Now, you can hit the "System sound" button to choose the sound source you prefer and adjust the volume. Upon that, click "REC" to start recording.
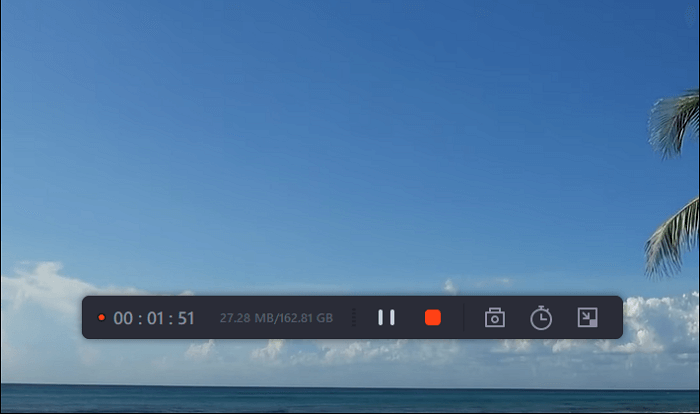
Step 4. When the recording is ongoing, you'll see a toolbar floating on the screen, which you can avail yourself of to pause or stop the recording process.
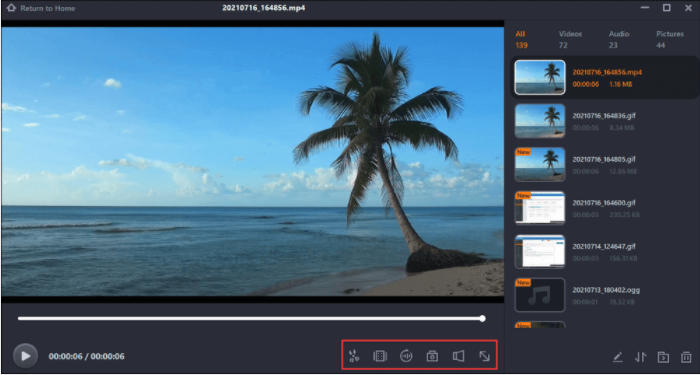
Step 5. Once you are done with the recording, click on the red stop button and then your captured video will be automatically saved on your device. You are also allowed to view the recording and utilize tools for trimming it, extracting audio from it, or adding an opening and ending section as the built-in media player appears.
Final Words
You now have two powerful methods if you are looking for screen recording in Windows 10. They are simple to use and come packed with features. However, if you are looking for the most user-friendly tool, go for the EaseUS RecExperts software, which can also help you flexibly customize the entire screen or part screen.
Price: It starts $19.95/Monthly.
Compatibility: Windows and Mac