Mac users can access the files and folders stored inside the storage. Even if you hide, folders can provide an easy view if you visit Finder. But the prime reason why you should hide the folder is to prevent the files from being accidentally deleted. If you hide the folders, the data is saved from random delete, and if you want to delete confidential data, you need to unhide them first. If you are working with a mass database and need Mac storage to refurbish regularly, you must know how to hide folders on Mac and protect the critical data from accidental delete.
There are methods to hide folders on Mac, and we will show you how to hide folders on Mac so that you can follow them and provide a protective layer to prevent them.
How to Hide Folders on Mac via Terminal
Using Terminal to hide folders engages very few steps, and even they are not complicated. Mac users know about the Terminal app and how to use the Terminal functionality wisely. Let's understand how you can hide folders using Terminal on Mac.
Here are the steps:
Step 1: Click on Finder and Open it.
Step 2: Choose Application from the left panel
Step 3: Check the Utilities; double click to enter the utility menu
Step 4: Double click on Terminal
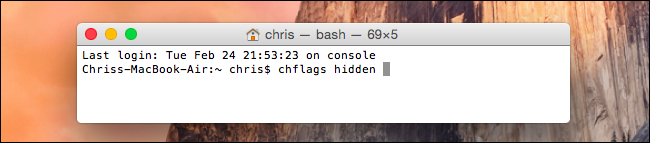
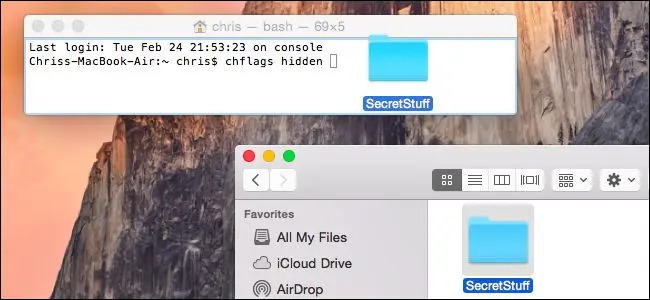
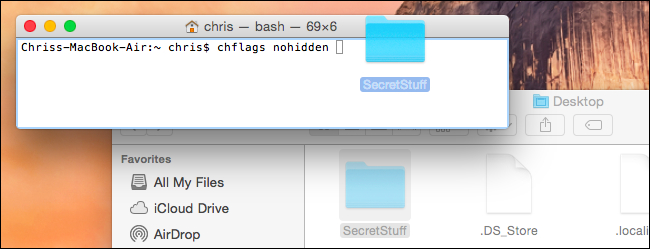
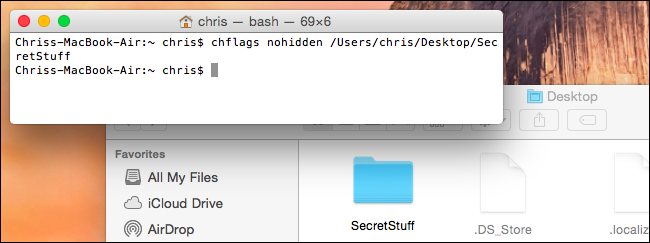
Step 5: Enter these text: chflags hidden
Step 6: Create a new folder to hide the files or folders

Step 7: Drag and drop those items into the Terminal window. Look closely and identify the folder's path that appears on the screen.
Step 8: Click on Return to hide the folder.
How to Hide Folders on Mac via FileVault
FileVault allows you to hide the folders with a secret code that could be your user ID password combination. The admin account credentials will secure the FileVault and prevent access or delete the items accidentally. Let's give a protective shield to your folders with FileVault.
Check the process here:
Step 1: Tap on the Apple icon from the upper left corner of the screen
Step 2: Tap on System Preferences
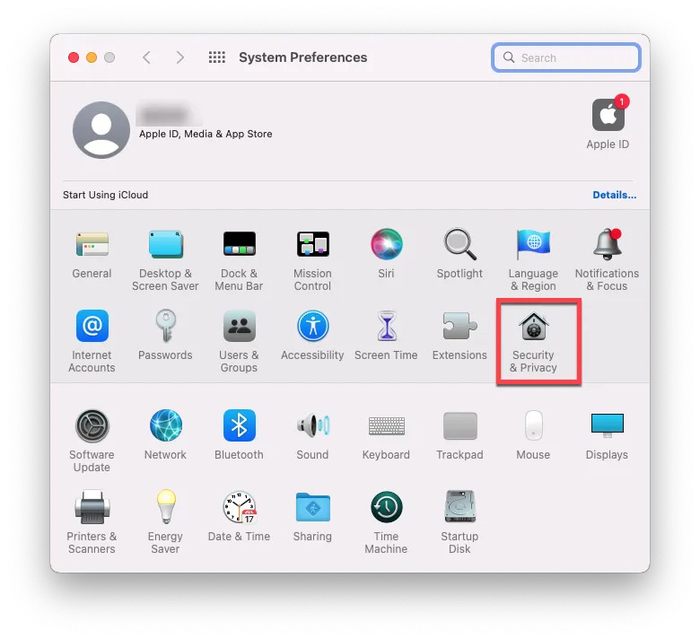
Step 3: Tap on Security & Privacy
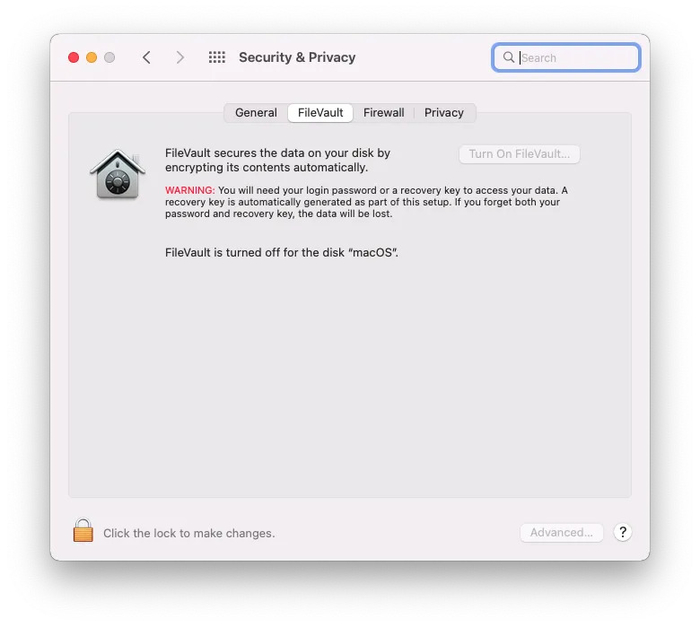
Step 4: Next to the General Tab, you can find FileVault
Step 5: If you want to make changes tap on the padlock icon
Step 6: To activate FileVault, tap on the Turn on button.
Step 7: Next option you'll get is to select the recovery method. Here you can use the local recovery key method if you don't want to use your admin detail.
Once you select the local recovery key method, it'll redirect you to another dialog box open, where a system-generated code will appear. It's like a Windows activation key. You need to save the key by entering it into a new document, and you can use it if you forget the password of FileVault.
Step 8: Tap on Continue
Step 9: Tap again on the Continue button to finish the process
Once the process is done, FileVault will start encrypting the data you enter into it. The encryption process will take time to complete. Make sure during the encryption, your Mac is in Power On mode.
How to Hide Folders on Mac via Apple's Developer Tools
If you want to use another Terminal hack to hide your folders loaded with personal data, you can select Apple's Developer tool XCode application. Though the app can occupy much of your system resources, you can try to hide your folders better with the app.
Let's follow the steps:
Step 1: Open Terminal and enter the following text command: setfile -a V < File Path > ( here, enter the file path you want to hide)
Step 2: Tap Return to run the Command
Step 3: Repeat the above method with every file and folder you want to hide
If you want to unhide your files and folders with XCode, simply lowercase the v. The command should be: setfile -a v < File Path >
How to Hide Folders on Mac via the "mv" Command
Using the mv command in the Terminal app to hide files and folders means you're shifting the location of your secret files and folders to another. The mv command is easy to follow to hide the personal folders from the system.
If you want to move the folders from download to the Work folder in the Documents, follow the simple steps:
% mv ~/ Downloads / Myfile. txt ~/ Documents / Work / Myfile. txt

You can change the file name and keep whatever suits the data you store in the folder.
How to Unhide a Mac Folder
We need to unhide folders to access them or check the data we store in the folders. Whenever you need to access them, you need to go to Finder and follow a few clicks to unhide the folders on Mac.
Process 1: Open/ Dialog function
Double click on Finder - > select Desktop -> Press the item icons in a list, column, or the library.
Repeat the process until the folders become visible
Process 2: Show the hidden folders/files in Finder
The terminal will help you locate and unhide the hidden files and folders whenever you need them. To charge up Terminal to follow your command, enter the below text:
Defaults write com. apple. finder AppleShowAllFiles True
Click Return to continue the process and again enter the following text command:
killall Finder
Click on return, visit Finder and access the hidden files and folders again.
One more way is there to unhide the folders on Mac. Check out the process:
Step 1: Visit the Folder function
Step 2: Enter the path of your hidden folder, and it will look like this:
~/ Desktop/ MyHiddenFiles
All your hidden files are visible on the screen to access them.
Bonus tip: How to Hide Folders on Windows
Windows users can pick EaseUS LockMyFile software to hide folders and prevent unwanted access and accidental deletion. The high-end tool EaseUS LockMyFile would provide witty coverage of your data inside the folders. You can encrypt the folders with password protection. The intelligent tool offers folders and file protection in many ways so that your data is never compromised with unofficial access. Its practical features set you free and let the tool take care of the protective measures. Compatible with all the latest and previous Windows versions, it offers both free and Pro modes.
Pros
- The tool can protect the local disk, external disk, and external drive with a master password and client password.
- Folder and disk monitoring help users to monitor even subfolders.
- It can lock LAN shared folders to limit access during shared folders.
- Advanced settings and Self-protection mode is available.
Cons
- No cloud storage support
- The file backup option is not included
Price: It starts $29.95/Monthly.
Compatibility: Windows 2000/2003/XP/Vista/7/8/10/11
How to Hide Files and Folders Using the EaseUS LockMyFile tool?
The tool offers file folder hiding by locking them to prevent access. Once locked, the files and folders become invisible, and without your permission, none can open them. Let's check how you can do it:
Before starting the process, downloads the free tool to hide files or folders on Windows:
Step 1: Run the program, and choose the Hiding file under the module of Local Disk.
Step 2: Tap on the Hide File, Hide Folder, and Hide Drive button to select whatever you want to hide. It'll then add to your list.
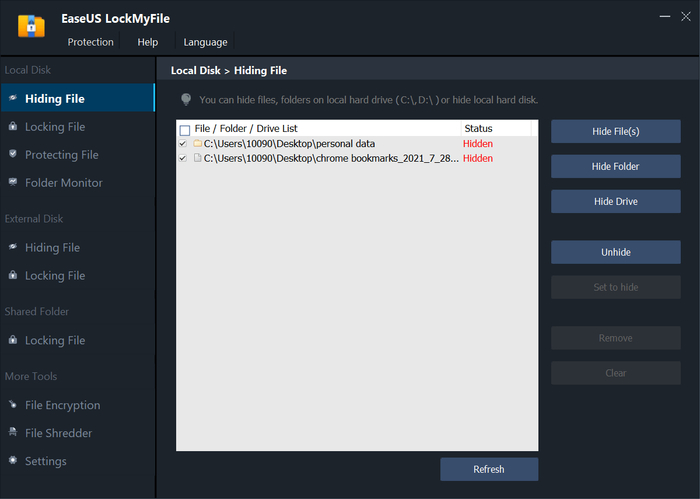
Step 3: Finally, tap on Ok and allow the tool to start the process
You can add as many folders you want to hide with the EaseUS LockMyFile tool.
Conclusion
Mac users can pick the easiest method to hide the folders we've mentioned here on how to hide folders on Mac. If you're working with a mass database and need solid protection from the professional folders, select the best way to hide them. Windows users can pick the EaseUS LockMyFile tool to lock and hide folders on Windows. If you're using the Windows version and need high-end data protection, install EaseUS LockMyFile software and shield your computer from data breaches.
Price: It starts $29.95/Monthly.
Compatibility: Windows 2000/2003/XP/Vista/7/8/10/11