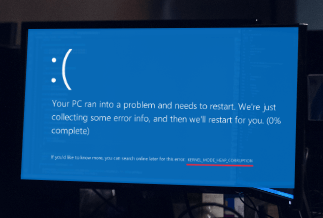
At times, you may have found your computer slowing down to a snail's pace due to a PC Doctor Module process running in the background. In such a situation, if you try to open the Task Manager on your device or any other program, you will see that the process takes longer than usual. You will also be prompted to message that a function named PC Doctor Module takes up almost cent percent of your CPU and a large chunk of the RAM. However, this state of affairs can be easily remedied with the help of three simple methods that you can explore in this article. First, it is essential to know if the PC Doctor Module is a virus or malware.
What is PC Doctor Module? Is it a virus or malware?
PC Doctor Module is essentially a component of DellSupportAssist that is a feature you will find in most Dell computers. It is an app that helps you with the process of downloading drivers as well as with minute troubleshooting. The issue then gets picked up by the PC Doctor Module and then sends a report to the Dell Technical Team for resolving.
PC Doctor Module is not a virus but a regular process that checks the system from time to time and is a part of the DellSupportAssist. However, a virus can mask PC Doctor and infringe on many resources. You can check if there is a problem doing a right-click on the PC Doctor Module and then clicking on Open File Location. If the location is not what is mentioned below, it entails a concern.
C:\Program Files\Dell\SupportAssistAgent\PCDr\SupportAssist\
3 Ways to Fix PC Doctor Module High CPU / Disk Usage
Solution 1: Modify Optimization Settings
You can use SupportAssist to modify optimization settings to help fix the PC Doctor Module's high CPU usage. You can do this either through the SupportAssist window or the services window.
1. Through the SupportAssist window
Step 1: Go to the Start menu and run SupportAssist.
You can do this by either typing supportassist in the search box or clicking on supportassist, which you will find under the Best match section.
Step 2: Go over to SupportAssist Scheduled Scans
Step 3: On the upper right corner of the SupportAssist, you will find a gear icon. Click on it to open Settings. Your hardware scans are set to run once every month by default.
Step 4: If you wish to deactivate the automatic scan option, uncheck the option that says Turn on automatic scans and optimizations. You can instead run a manual scan according to your demand from the Home tab
2. Through the Services Window
Step 1: Open the Run window by pressing together the Windows and R keys
Step 2: Next type of services. msc and press enter to open the Services window
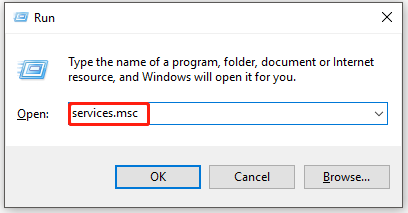
Step 3: Go to the Services window and look for SupportAssistAgent. Double click on it and set it to Automatic by default
Step 4: Save the changes made by clicking OK
Solution 2: Disable automatic scan for Dell SupportAssist
You can fix the error and optimize SupportAssist settings by following a few easy steps.
Step 1: Go to the Windows Start menu and open the SupportAssist app
Step 2: Go to the History tab and go to the recently completed scheduled scans
Step 3: On the SupportAssist window, look at the top right corner and click on the gear icon
Step 4: Next, uncheck the option that reads ‘Turn on automatic system scans and optimizations at’ to disable automatic scans
Step 5: You can also choose to alter the scan schedules
Solution 3: Uninstall SupportAssist
If you think SupportAssist is an option you can do without, go ahead and uninstall it and, in the process, get rid of the PC Doctor Module on your computer. Follow the below steps to do this.
Step 1: Press the keys Windows + X and then click on Apps and Features
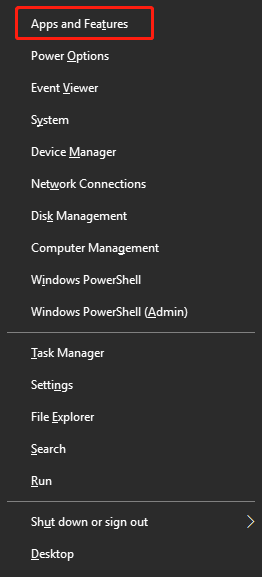
Step 2: You will find a list of contents under apps and features. Scroll down the entire window to find DellSupportAssist
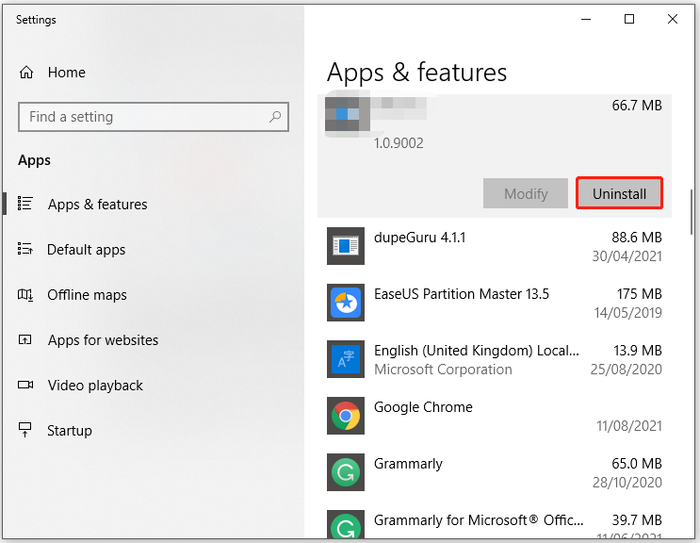
Step 3: Tap on DellSupportAssist and then select Uninstall. Complete the process of uninstallation by following the instructions on the screen
Bonus: Professional PC Cleaner: EaseUS CleanGenius for Windows

PC Doctor Module can make your computer sluggish, which can be enormously frustrating because it would mean slow computer operation and load times. With the help of EaseUS Clean Genius, you can have access to a powerful booster. The tool gives you a one-stop solution for Windows users to increase the speed of their PC and free up disc space and optimize and repair OS.
Features
- With just a single click, the tool helps to quickly and deeply scan and optimize your PC
- It helps clean up and speed up your computer
- Easy management of your computer with Startup Manager, Memory Manager, and shutdown Scheduler
- Keeps your PC safe
The usage of the Ease US Clean Genius
Use this powerful tool to do a quick and deep scan of your computer OS to scan for problems and clean, repair, and optimize your system quickly. You can now get rid of junk files, useless shortcuts, and unwanted software and locate and remove cloned, empty, large-sized, or recently modified files. You can now simplify and manage your startup programs and uninstalled applications and speed up, split, or divide any file.
Wrapping Up
Struggling with constant errors on your computer can be profoundly frustrating, and the PC doctor Module is one such concern that you may be faced with. However, you can now get rid of the PC Doctor Module's high CPU usage error quickly and effortlessly with the help of several different methods, which have been discussed in the above article. You can either choose to modify optimization settings, entirely disable automatic scan for dell Support Assistant, or uninstall SupportAssistant as per your requirement. Alternately you can just go for an easy one-stop solution and employ the EaseUS Clean Genius for Windows cleaner to get multiple solutions with just a single click.