Sometimes when you have trouble with your PC running on Windows 10 or Windows 11, and there is a need to run Startup Repair, you may find that Startup Repair acts up, and instead, your screen flashes an error message that states that your Automatic Repair Couldn't Repair Your PC.
It effectively means that your Windows recovery tools cannot fix the errors. There could be various reasons for this, such as the presence of a corrupted file or a bad sector in your storage device that contains the Operating System.
There could be some other reasons as well for this issue:
- HDD with bad sectors
- A faulty or insufficient RAM
- Continual power failure
- Incorrect registry editor values
- The computer shut down in the middle of an update
If you are thinking of a well-devised mechanism to help fix these issues and various other PC errors, you can try the System Mechanic Ultimate Defense software.
Let us quickly brief you about this professional tool to help save you time and increase your system’s performance and productivity.
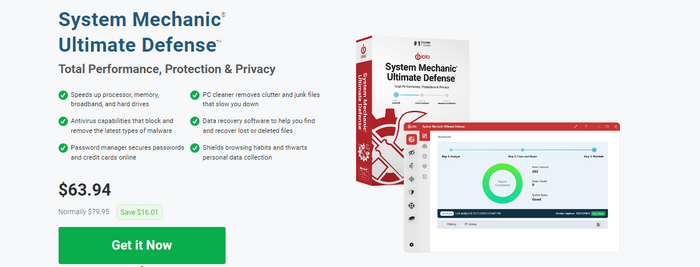
System Mechanic Ultimate Defense is a complete package that can help you address Automatic Repair Couldn't Repair Your PC error and all your performance, privacy, and security needs. It has an easy and convenient interface that helps secure your web browsing, removes malware on-demand with an antivirus feature, and manages passwords and credit cards as well.
This powerful tool comes packed with advantages and features:
- It is a PC cleaner that helps remove junk and clutter that can slow down your PC
- Speeds up hard drives, processor, broadband, and memory
- Antivirus capabilities
- Password manager
- Data recovery
Price: It starts $79.95/Year.
Compatibility: Windows 11/10/8.1/8/7
How to Fix It When Automatic Repair Couldn't Repair Your PC
You can always experiment with multiple methods to detect the exact cause of your problem and resolve it smoothly. We have listed the top 8 methods and a quick guide to repair and fix your PC issues. So let's have a look.
Method1. Run fixboot and/or chkdsk command
Whenever you encounter an error message that states Automatic Repair Couldn't Repair Your PC, you can find a solution to the issue with this method.
Step-by-step guide
Step 1: Restart your computer and continually press F8 until you see the Windows logo
Step 2: Click on Troubleshoot > Advanced Options
Step 3: Go to the list of options and select Command Prompt
Step 4: Type the below lines and hit Enter after each to run it
bootrec.exe /rebuildbcd
bootrec.exe /fixmbr
bootrec.exe /fixboot
Step 5: You can also run a chkdsk command by entering the following and then restart your computer to check if the problem is resolved
chkdsk /r c:
chkdsk /r d:
Method 2. Run DISM
If the issue of Automatic Repair Couldn't Repair Your PC persists, you can try this method to resolve it.
Step-by-step guide
Step 1: Enter the boot options menu
Step 2: Click on Troubleshoot > Advanced options > Startup Repair
Step 3: Select Restart to start your computer again and get a list of options, pick the option Enable Safe Mode with Networking.
Step 4: When the safe mode is activated, download an updated version of the driver you are facing concerns with.
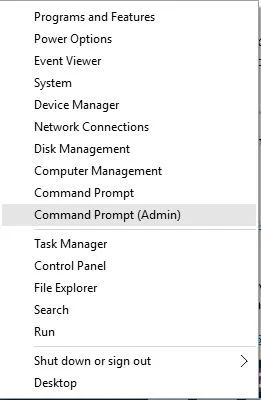
Step 5: Press Windows Key + X, and from the list, select Command Prompt (Admin)
Step 6: Now copy the below and run it by pressing Enter
DISM /Online /Cleanup-Image /RestoreHealth
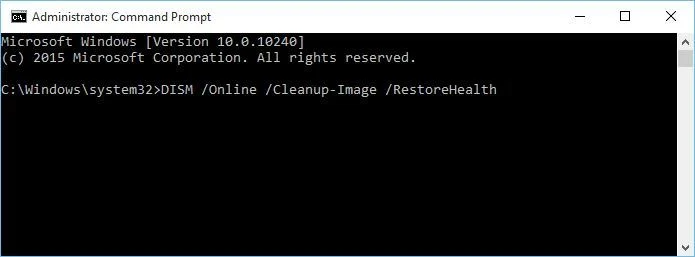
Step 7: Let the process complete. It may take about 15 minutes, after which you need to restart your computer.
Step 8: Once the PC restarts, install the driver that you had downloaded from the manufacturer's website and saved to your USB flash drive
Method3. Run Bootrec Command to Rebuild Windows BCD
If the problem of Automatic Repair Couldn't Repair Your PC is still there, you can check the Boot Configuration Data file to reconstruct and repair the Master Boot Record file.
Step-by-step guide
Step 1: Click on Advanced Options and then select Command Prompt
Step 2: Your system will then ask for the password. Enter the password
Step 3: To your screen’s right side, you will find a Command Prompt. Enter the following commands to fix Boot Sector problems
bootrec.exe /rebuildbcd
bootrec.exe /fixmbr
bootrec.exe /fixboot
Method 4. Disable Early launch anti-malware protection
If you still face the problem of Automatic Repair Couldn't Repair Your PC, you can try this solution.
Step-by-step guide
Step 1: Click on Advanced Options > Troubleshoot > Advanced options > Startup Settings
Step 2: Once you get to the Startup Settings page, click on the Restart button
Step 3: On your screen, you will see Startup Settings. Next, reach out for your keyboard to tap on the ‘8’ key and opt for the Early Disable launch setting for anti-malware protection.
Method 5. Disable Automatic Startup Repair
Sometimes if your problem pertains to a system drive-related issue, the Automatic Repair Couldn't Repair Your PC pops up automatically during the system boot.
Step-by-step guide
Step 1: Click on Troubleshoot > Advanced options > Command Prompt and enter the below-mentioned command:
bcdedit /set recoveryenabled NO
Step 2: Restart your system to find out whether the issue is fixed or not
Method 6. Restore registry from RegBack directory
You may sometimes face the error; Automatic Repair Couldn't Repair Your PC due to a wrong registry value. In this case, you may try restoring the registry.
Step-by-step guide
Step 1: Go to Advanced Options and open the Command Prompt
Step 2: Enter the following command-
copy c:\windows\system32\config\RegBack\* c:\windows\system32\config
Step 3: When prompted whether you want to overwrite all files or partially, select All files and hit Enter
Method 7. Delete the problematic file
Sometimes specific files like VMW can cause the Automatic Repair Couldn't Repair Your PC issue. Check the log files by following the below steps.
Step-by-step guide
Step 1: Open the Command Prompt. Next, type the given command:
cd C:\Windows\System32\LogFiles\Srt
SrtTrail.txt
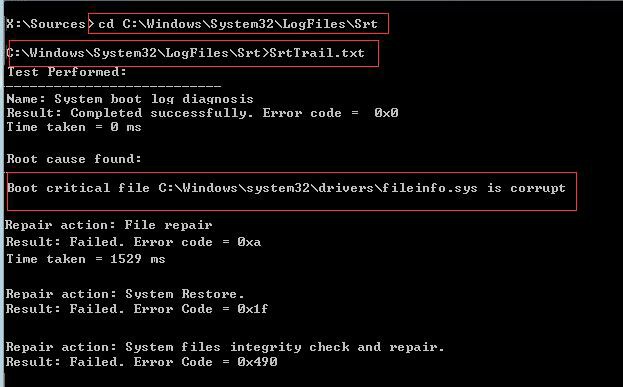
Step 2: Once the file opens, you will see this "Boot critical file c:\windows\system32\drivers\tmel.sys is corrupt." Then delete the problematic file by typing the following command in cmd:
cd c:\windows\system32\drivers
del vsock.sys

Step 3: Restart and check whether the issue is solved or not
Method 8. Reset the PC
You will find this option in Windows 10 and 11 PCs to get factory settings without having to remove any personal files. It may also help you solve the problem of Automatic Repair Couldn't Repair Your PC. However, you must use this method as your last resort.
Step-by-step guide
Step 1: Go to Troubleshoot menu
Step 2: Select the Reset this PC option
Conclusion
So, now you know a host of methods to fix the problem of Automatic Repair Couldn't Repair Your PC. You can either rebuild BCB and repair MBR or run chkdsk with the help of a few simple steps. However, if the error persists, you can try running FC and using DISM Tool in Safe Mode or disabling early launch anti-malware protection/ automatic Startup Repair.
Also, suppose you are looking for an alternative. In that case, you can try using the System Mechanic Ultimate Defense software, possibly as it is one of the easiest methods to help resolve your PC issues. The tool helps bring about complete security and privacy and takes care of your performance needs with a single and convenient interface. It can also help eliminate your Automatic Repair Couldn't Repair Your PC issue, along with a host of other concerns you may face.
Price: It starts $79.95/Year.
Compatibility: Windows 11/10/8.1/8/7