A training video is simply video content that demonstrates how to accomplish something.
A training video is dedicated to educating or instructing viewers on a specific topic to teach a skill or impart knowledge, whether it is an employee training film, a software instructional for clients, or a broad topic like how to replace a tire.
Why We Need a Perfect Training Video
Because video can show and inform viewers what they need to know, it is ideal for how-tos and training. Furthermore, video is more interesting than text-only techniques.
Consider this. Which would you prefer: Would you rather read ten pages of black and white text explaining how to accomplish something or watch a video showing exactly what steps to take?
If you're still wondering why you should bother making films, here are a few significant advantages you may get this year:
- Increase visitors to your website.
- Improve Google search outcomes
- Remove the stress from your technical or customer support crew.
- Increase client satisfaction.
- Create more knowledgeable consumers and users.
- Expand your company.
How to Make Your Training Video More Attractive and Engaging
To make your training video more appealing and engaging, follow these steps from beginning to end to ensure you don't miss anything.
1. Find the right equipment
When you're ready to begin making a training video, you'll need specific equipment to ensure that your video looks and sounds its best.
Among the items on this list are:
- A microphone
- Camera
- Screen recording software
- Video editor
Because (nearly) everyone has a smartphone or laptop with a built-in camera, buying another one may be unnecessary. You may produce easy training films using screen capturing software by recording any portion of your computer or device screen.
2. Choose a topic
The following step is to select a helpful and appropriate topic for your training video. To do so, evaluate who your audience is and what they hope to learn from viewing your film. This will aid in narrowing down the aim and message of your training film.
If you are unsure, conduct further research. This might include sending out a survey to your consumers to respond to the most often asked queries about your product or service. Your training film may then address all of their questions and give more instructions on using certain aspects of your product.
3. Choose a format
The structure of your training film will determine how much time and money you spend on it. Among the most prevalent forms are:
Screencast: A screencast trainer video, as previously said, is a recording of your computer screen. These are ideal for teaching people how to use new software or computer systems.
Micro video: These are short training films that cover a single subject. These are often less than a minute long, to the point, and cater to the ordinary media consumer, who has a shorter attention span while watching video material.
Presenter Video: Presentation videos are utilized when you record the slides you generated with presentation software so that they are available for the intended audience to watch after the fact or for individuals who want to revisit the presentation numerous times after it has concluded. Simply capturing the audio may be used to produce these videos. They also have a longer duration than other types of videos.
Animation: Animated videos, usually explainer videos, use animation software to integrate text and visuals to convey the idea.
Interactive: Interactive training videos are a newer type in which viewers are requested to answer various scenarios and questions as the video plays. This is a great approach to keep viewers' attention or to test them on the content covered in the video.
4. Create the script and storyboard
Create a script and a storyboard to help you get your training video ideas down on paper.
A storyboard is a process of graphically depicting each shot, whether done by hand or computer software. Both are necessary procedures in preparation for recording your training video.
These two can complement each other since the narrative will focus on the spoken word, and the storyboard will focus on the images. When you look at each frame, you can better examine the graphics in your movie and decide what is ideal for the overall goal of your training video.
5. Use video editing software
This phase becomes much less frightening when your team uses the correct video editing software.
After you've listened to your tape a few times, you may use these tools to rearrange and arrange video files, edit the audio, add graphics and annotations, color correct, and much more.
When you're through editing, check the video repeatedly to ensure that the transitions between segments are seamless and that there are no gaps in the material. Get a second or even third opinion from someone on your team to guarantee you haven't overlooked anything.
Complete Guide to Make a Perfect Training Video
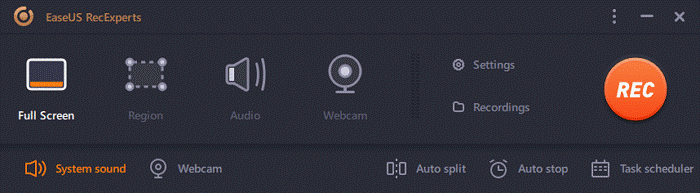
EaseUS RecExperts is a powerful screen recorder that can record everything on your screen.
This program supports audio, webcam, app, and game recording. These features combine to make it a formidable tool capable of producing teaching videos for practically any subject. Whether you want to chat about technology or computer gaming, it may always be handy.
Using the audio recording capability, you may record both system sound and your speech via the microphone. When you need to explain something using your voice, you can use this tool to record a clear voice and include it in your lesson video.
Price: It starts $19.95/Monthly.
Compatibility: Windows and Mac
Aside from the tasks listed above, this program can also record Webex meetings and screen drawings.
Step-by-step guide:
Step 1: Launch the EaseUS RecExperts software on your computer.
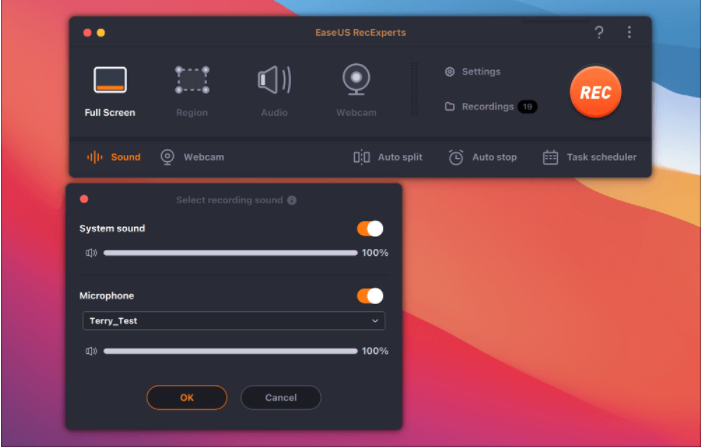
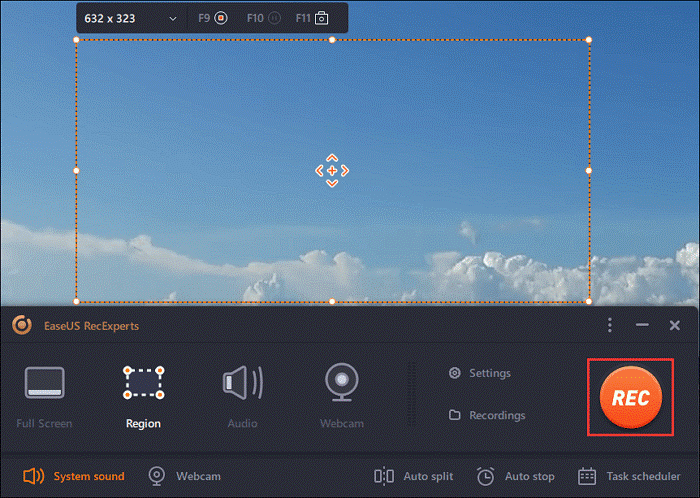
Step 2: You can either click the "Full Screen" option (for recording the whole screen) or select "Region" (for customizing the recording area). Upon that, choose the recording area with your mouse. If you want to record video with audio, you need to click the "Sound" icon on the bottom-left corner.
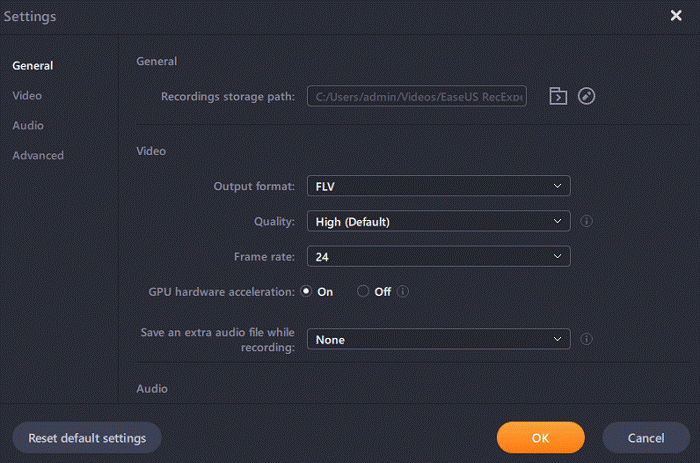
Step 3: Click the "Settings" button to apply more options and select the corresponding specification based on your needs. When finished, click "OK".
Step 4: Hit the "Sound" button on the bottom-left corner and open the system or microphone sound if you prefer to record audio and screen simultaneously. With that, select "OK" to ensure the audio options.
Step 5: Click the "REC" button to start recording. And click the red button on the timing bar to stop recording when it finishes.
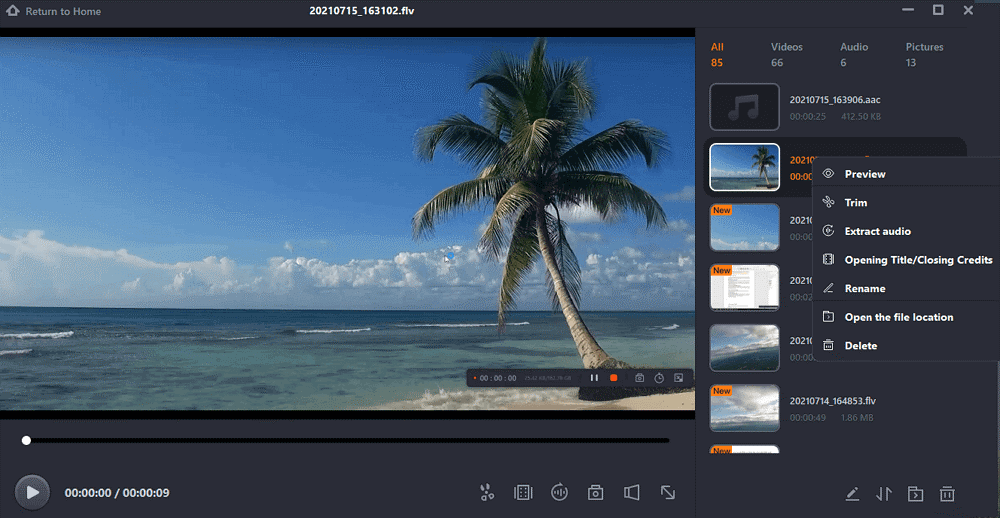
You can find the recording videos in the "Recordings" which is located in the main interface. Select the video and edit it as you want.
Wrapping Up
Training films are one of the most effective methods of staff training. Creating excellent training films has become more accessible and more economical than ever before, thanks to the introduction of modern video creation tools. The instructions in this post are only the beginning; the universe of training videos awaits you! EaseUS provides an excellent mix of a recorder and a video editor. You can record nearly anything with EaseUS RecExperts, including webcam and system sound.
Price: It starts $19.95/Monthly.
Compatibility: Windows and Mac