MMC abbreviates Microsoft Management Console, a Windows OS feature and comes as a user's built-in. It assists in managing snap-in that comes as a base component in consoles. However, sometimes a message like 'MMC could not create the snap-in' may pop up on the screen and CLSID as an error number. It means that snap-in is not working correctly, or the configuration of its registry may be broken.
This error occurs commonly on Windows OS and primarily on Windows 7 and the 2008 server; however, this does not mean that it cannot happen on any other Windows OS. Whenever the user is about to use Task scheduler, Event Viewer, or Group policy editor, this error is expected.
So, what can you do to get over this issue? Many solutions can assist you with the problem, but we are listing the top 5 of them to solve your subject entirely.
Reasons Why MMC Could Not Create The Snap-in Appear
In this part, you should find and analyze the specific reasons why this error appears and tell readers we will provide five available solutions.
Sometimes these snap-ins do not act normal, and error messages like 'MMC could not create the snap in' occurs on the screen. It may show up when you create or deploy a package containing a large solution with many items. There may be several reasons why MMC may allow only some specific types of snap-ins for completing any action. This message pops up when it's time gets exceeded.
Even if the message appears on screen, the Deployment and Package thread does not get affected and continues its function as a background task.
To assist you with solving this error, we provide 5 Ways to fix it completely. Let us get to them in detail.
5 Ways to Fix MMC Could Not Create the Snap-in Error
Solution 1: Fix Your Register
The configuration of your registry may be a reason for the occurrence of this error. So the users must try to fix this as early as possible. However, before proceeding with the registry editor, the user must go for creating a backup of the same. It is advisable because if any mishap occurs, the data is ready for import to make things normal again.
Steps to be taken:
Step 1: First, start with opening Run and you can do this by switching to the Start menu, right-clicking on it and selecting the option.
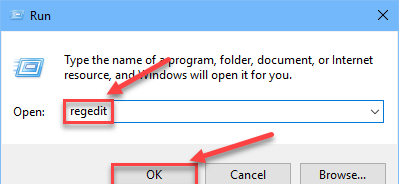
Step 2: You will see the Run window as the last step in the pop-up window. Now you have to start typing regedit and proceed with clicking on the Ok option.
Step 3: Now, look for the Registry Editor that has opened in the last step. Then you have to follow the path instructed on the Windows on the left side.
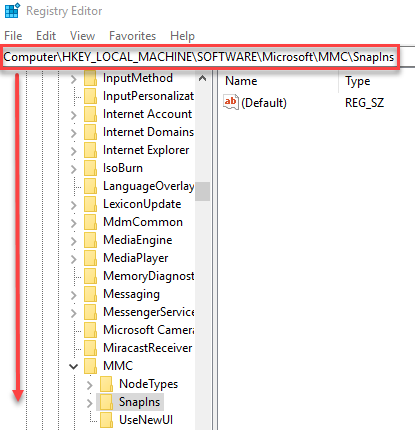
Step 4: To expand the Snapins folder, you must double-click on it. Further, you have to look for the specific error message, and it will be given as CLSID.
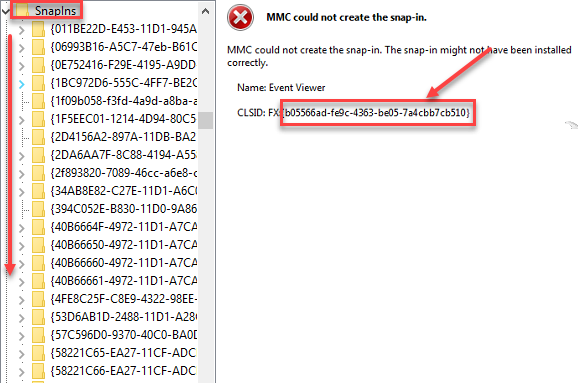
Step 5: As soon as you find the correct folder select the Delete option by right-clicking on it. After this, click Yes on confirmation.
Step 6: You can restart your device. Otherwise, you can move to the next solution.
Solution 2: Rename MMC.exe
Just follow the given steps, and it will sort you well.
Steps to be taken:
Step 1: First, you have to find and then proceed with clicking on File Explorer to open it. Then you have to move further by browsing and finding the location: C:\Windows\System32.
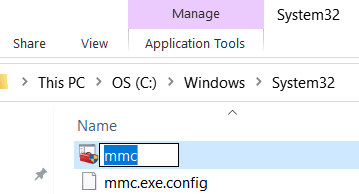
Step 2: You have to rename mmc.exe and make it MMC.exe.backup.
After completing these steps, try to see if your issue is fixed.
Solution 3: Run System File Checker
Sometimes corrupt files cause the 'MMC could not create the snap in' error. In this method, you will be able to check corrupt files and fix their issue. We can do so with the in-built tool of Windows 10- SFC Scan.
Steps to be taken:
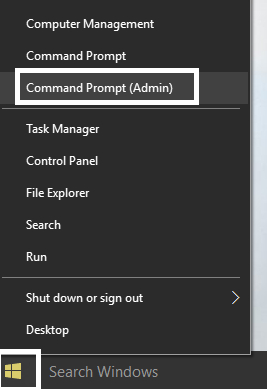
Step 1: As an administrator, you must first open the command prompt by typing it in the search area. Then click on the same and select Run as administrator option. After this, click on the Yes option when the command prompt opens.
Step 2: You have to type sfc/scannow in the window for the command prompt and then press the Enter button.
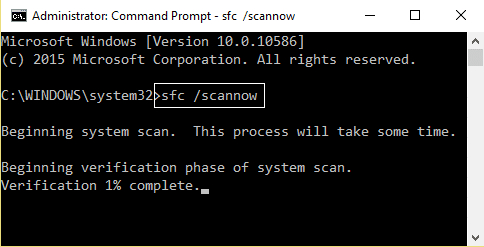
Step 3: Then you have to be patient for the process to finish, and it may take around 15 minutes. After the process gets completed, you can restart your device.
Solution 4: Perform DISM Scan
DISM stands for Deployment Image and Service Management scanning. It is an in-built feature of Windows 10 that acts as a troubleshooter and helps search and fix any corrupt files. It works well and is used when SFC Scan cannot do the job.
Steps to be taken:
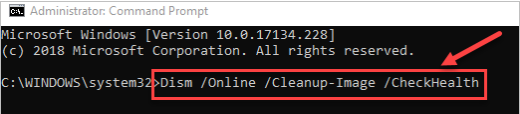
Step 1: Start with opening Command Prompt as Admin. For this, you have to search for it in the search area and by right-clicking on it, choose run as administrator. When prompted with a confirmation box, click on the Yes button.
Step 2: As soon as Command Prompt Window opens, type these commands and proceed with pressing Enter.
Dism /Online /Cleanup-Image /CheckHealth
Dism /Online /Cleanup-Image /ScanHealth
Dism /Online /Cleanup-Image /RestoreHealth
Step 3: You may have to wait for 20 minutes or more for the system to complete the scanning process.
Step 4: As soon as it is done, press the Restart button.
Solution 5: Enabling Microsoft .Net Framework
If the above two methods have not worked for you, you must try turning on your .NET framework. You have to follow these simple steps:
Steps to be taken:
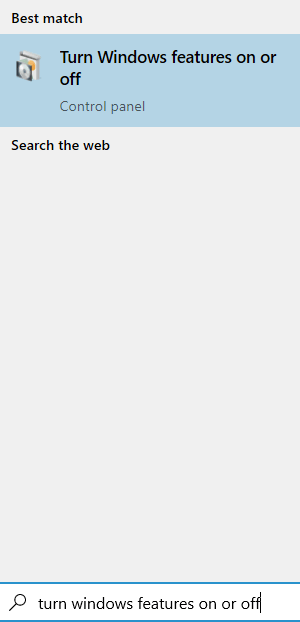
Step 1: In the search bar of your Windows PC, look for Turn Windows features on or off.
Step 2: Click on the feature.
Step 3: As soon as you do this, you will land on the Windows features page. You have to turn it either on or off from the small window.
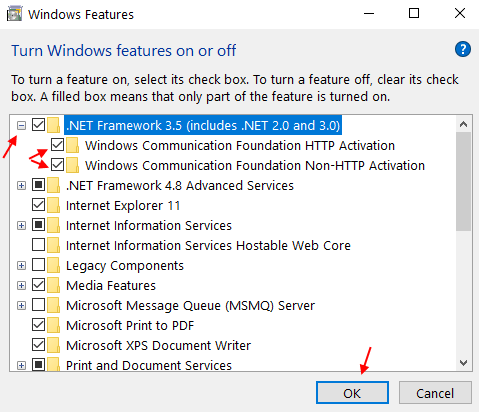
Look for the box given with the message .Net Framework 3.5 and check on it. Then after expanding it, you have to mark it and then click on Ok.
Step 4: After that, you have to restart your PC.
Conclusion
The methods given above solve the 'MMC could not create the snap-in' issue. But in some cases, if one of the methods does not work, you always have another one to take place and solve your problem. Sometimes DISM scan may work for you but enabling the .Net framework may not work out. In some cases where the SFC scan does not respond, the users can use the DISM scan instead of struggling with the problem.
After completing some of these methods, you may need to restart your PC to complete this process to achieve the desired results. You have to take a backup of the valuable data before applying any of these methods. We hope you found all the ways mentioned earlier practical and will be able to solve your problem instantly when the error message pops on the screen.