The Critical Process Died blue screen problem on Windows 10 (bug check 0x000000EF) indicates that a crucial process essential to Windows' function has been stopped due to damage or corruption. The issue might arise due to a Windows or driver update, but it can also be caused by malfunctioning hardware.
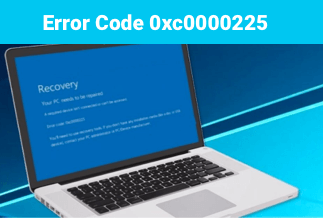
Windows 10 is unable to start usually, and an error notice appears "Your machine has a problem and needs to be restarted. Look for the error CRITICAL PROCESS DIED on the internet", and then it starts over.
What Does Critical Process Died Mean?
The majority of BSODs are caused by a vital process unexpectedly stopping. If you've been a victim, you'll notice the error code 0x000000EF on the blue crash screen.
The problem is simple at its most basic level: a background process that Windows relies on has gotten corrupted. It could have either completely halted or had its data wrongly updated.
It gets increasingly difficult to find the exact problem as you delve further. It might be anything from faulty drivers to memory issues. Worse yet, there are virtually infinite scenarios where the BSOD could occur. Maybe it happens when you're gaming, logging into your machine, opening a specific app, or waking your device up from sleep.
5 Working Ways to Fix Critical Process Died Issue
Method 1: Restart Computer in Safe Mode
This problem will render your desktop or laptop inoperable, requiring you to restart it. This problem occurs every time you restart the machine. You can restart the computer in safe mode in this instance.
This is a quick way to start your computer's Windows system, and it may prevent you from obtaining this problem during the beginning process.
Step 1:Windows should be restarted.
Step 2:Before Windows 10 starts booting, use Shift + F8 to force it into recovery mode; you can access Safe Mode.
Step 3:To start your computer, navigate to Advanced Boot Options and select Safe Mode as the boot mode.
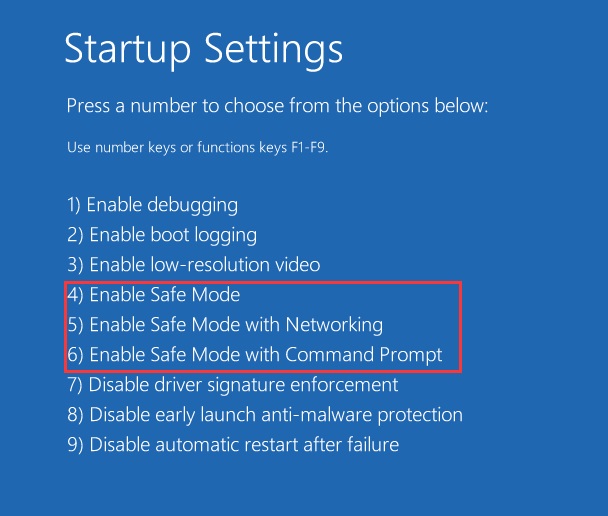
Safe mode can also be accessed in another method. To boot to WinRE, please use an installation DVD or restart your PC numerous times. Then select Troubleshoot Advanced options Startup Settings Restart from the Troubleshoot menu. See the screenshot below; tap the correct key to activate Safe Mode.
Method 2: Run the SFC Scan
The system file checker is abbreviated as SFC. It aids in the replacement of defective or malfunctioning system files with fresh, functional ones.
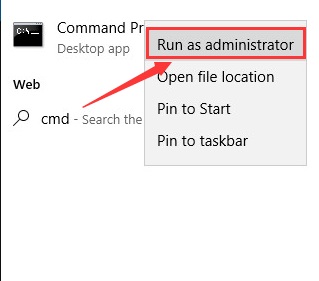
Step 1:Type cmd after pressing the Windows logo key on your keyboard. When you right-click Command Prompt, choose Run as administrator from the context menu.
Step 2:Press Enter on your keyboard after typing sfc /scannow.
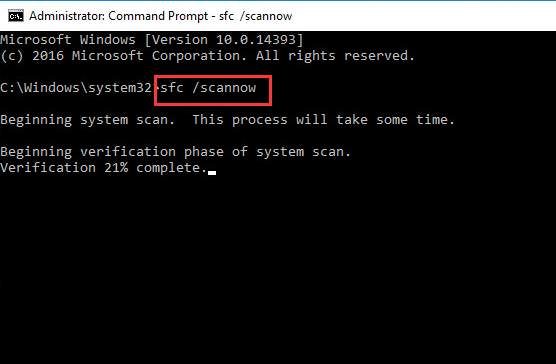
Allow some time for this process to complete. Restart your PC after that.
Step 3:When the check is finished, restart your computer. Check to see if the Critical Process Died error reappears. If the issue persists, go to the DISM check.
Method 3: Update Your Device Drivers
Driver Easy can update your drivers for you if you don't have the time, patience, or technical abilities to do so yourself.
Driver Easy will detect your system and locate the necessary drivers. You are not required to know the operating system installed on your computer. You don't have to be concerned about downloading and installing the wrong driver or making an error during installation.
Price: Its 1 PC version costs $29.95/year, 3 PCs version costs $59.90/year.
Compatibility: Windows
Step 1: Driver Easy is available for download and installation.
Step 2: Launch Driver Easy and click the Scan Now button. After that, Driver Easy will scan your computer for any problematic drivers.

Step 3: Click the Update icon next to a driver to have it automatically download and install the latest version.
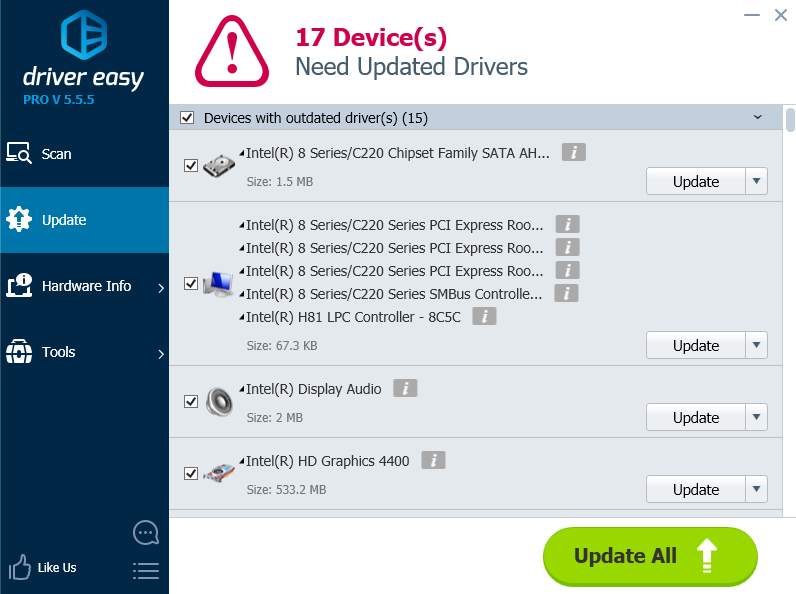
Or, if you have the Pro edition, select Update All to automatically download and install the correct version of all missing or out-of-date drivers on your system (you'll be prompted to upgrade when you click Update All).
Method 4: Repair Windows OS with System Mechanic Ultimate Defense
PCs steadily degrade with time and with regular use: poor performance, weird error messages, software lockups, and crashes at inconvenient times—we've all experienced it. And this is why iolo designed System Mechanic Ultimate Defense: to address the various, varied causes of these issues and prevent them from reoccurring.
Price: It starts $79.95/Year.
Compatibility: Windows 11/10/8.1/8/7
Step 1:Examine Your Computer
When you first launch System Mechanic, you'll be on the Overview pane of the Dashboard.
Simply click Analyze Now and watch as System Mechanic analyses and checks your system for faults.

Step 2:Resolve Issues
Now that you've diagnosed your system, you have the option of doing any necessary repairs in one of the following ways:
- Simply click Repair All to swiftly apply the necessary fixes and improvements. System Mechanic will execute repairs and optimizations using default settings if you select this option. This is the most efficient and convenient method of keeping your computer in good working order.

- View details: Click View Problems to acquire more information before performing any repairs. The Problems window will appear, displaying a list of all the issues found on your machine and information on how a repair will assist. Then you can determine which issues you want to address.
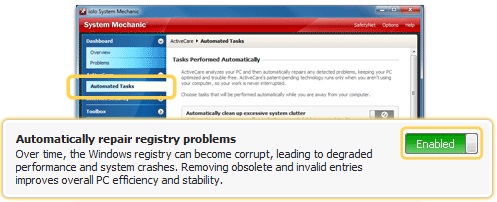
Step 3:Create a system for automated monitoring and repairs.
The Automated Tasks window allows you to choose and choose the automated fixes ActiveCare performs. To turn the automated fix on or off, go to ActiveCare> Automated Tasks and click the toggle button next to a task.
Method 5: Perform a Clean Boot
Clean boot is a sort of boot sequence that allows only relevant files to be loaded into memory, which helps to reduce starting time. It aids in the resolution of the vital process died error in Windows 10 by turning off all other software and services.
To enable a clean boot, follow the steps outlined below:
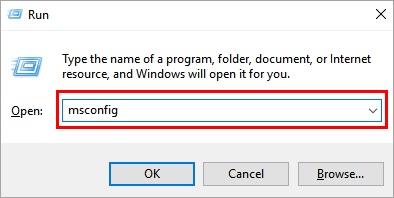
Step 1:As illustrated in the screenshot below, press the "Windows+R" button on your keyboard and type "msconfig."
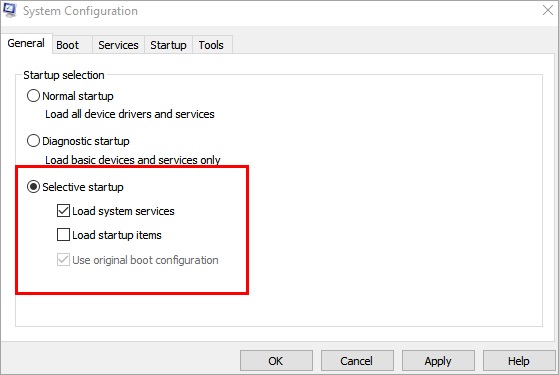
Step 2:As seen in the image below, open a window, select "Selective startup", and uncheck "Load startup items."
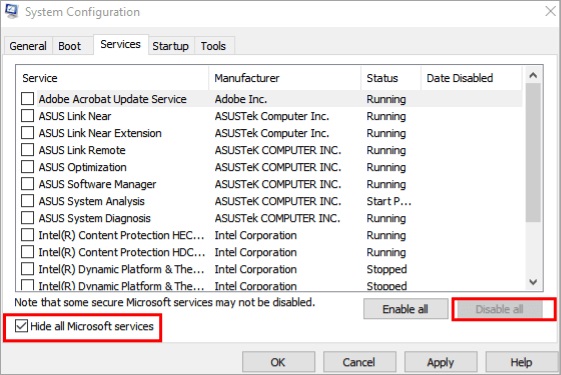
Step 3:As indicated in the image below, go to "Services" and tick "Hide all Microsoft services." To disable all services at boot time, click "Disable all."
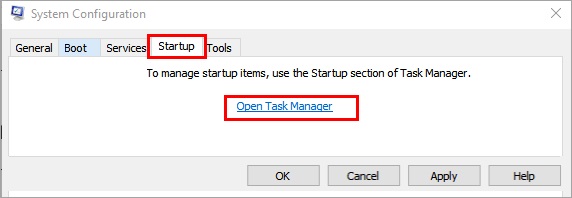
Step 4:Now, as seen below, click "Startup" and "Open Task Manager."
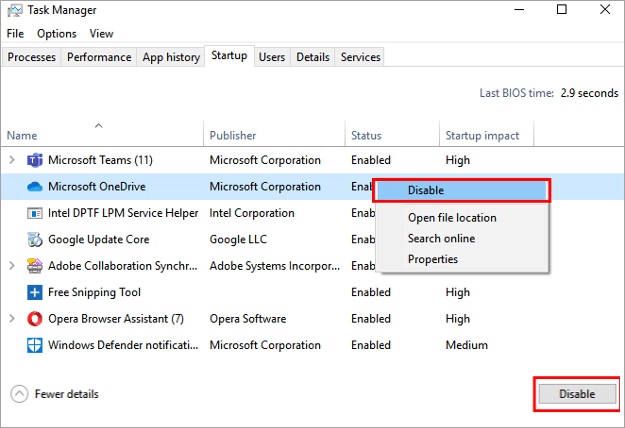
Step 5:Right-click each application and select "Disable" from the drop-down menu, or click the "Disable" button at the bottom.
Final Words
You should be able to resolve the Windows issue Critical Process Died in no time if you attempt each of the options suggested above. The good news is that it's incredibly unlikely to reoccur once you've fixed it. In addition, the techniques described in this article can be used to diagnose a variety of other computer problems.