The Snipping Tool is vital Windows built-in screenshot software that allows you to take snapshots of the screen, edit, and save them directly onto your PC.
However, you may stumble across the issue of the Windows snipping tool not working at times. It may show a black screen or blank screen rather than the actual screenshot or pop up nothing as you click on "save as." Such issues will definitely hinder your workflow and slow you down.
Today's how-to guide will offer you some practical methods to fix the snipping tool not working issue without any hassle. Read on and learn how to resolve this problem smoothly.
How to Fix "the Windows Snipping Tool not working" issue
Method 1. Restart the Windows File Explorer
There is a high chance that the Snipping Tool issue stems from the File Explorer service as the Snipping Tool is a subset of it. When File Explorer turns unresponsive, the Snipping Tool shall go wrong as well.
Therefore, you can try to tackle this problem by rebooting File Explorer. Here's how to do that.
1. Tap Ctrl + Alt + Del simultaneously and select Task Manager. Also, you can press CTRL + Shift + ESC together to head over to the Task Manager directly.
2. Swipe down to find Windows Explorer and right-click it. Upon that, click Restart from the drop-down menu that.
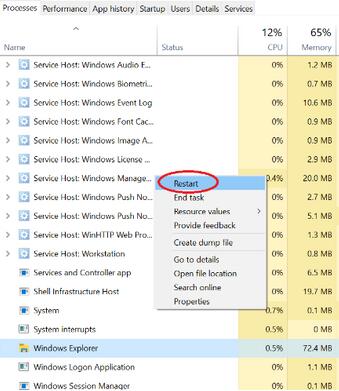
Note: Several strange changes may happen as the File Explorer restarts, including the taskbar vanishing or the desktop wallpaper turning totally black. Yet not to worry. All of these changes are fairly normal since the whole of these elements relies on File Explorer.
Method 2. Run "sfc /scannow" Command
Another way you can try is to use the "sfc /scannow" command. This method works by using System File Checker, a Windows built-in utility to check whether there is a system error.
1. Press Windows logo+ "R" together and type "cmd." Upon that, tap "Enter."
2. Type "sfc /scannow" in the command line and tap "Enter."
3. Type "snippingtool.exe" to see whether the problem is resolved, then press "Enter." If the tool launched smoothly, make a shortcut to verify it.
Method 3. Find out the conflicting software
There may be other software on your device conflicting with Snipping Tool and leaving it not to work. To tackle the problem, follow the below-detailed instructions:
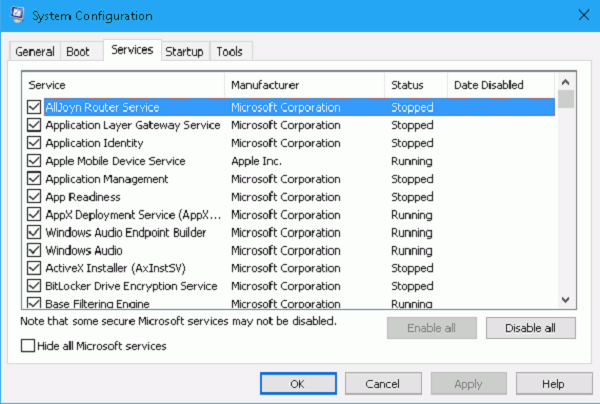
1. Press Windows logo and "R" together, type "msconfig", and press "Enter."
2. Click on "service" in the System Configuration window and mark "Hide all Microsoft services." With that, stop the suspected services, especially the newly-installed software.
Method 4. Run Windows Update Troubleshooter
You can also fix the Windows snipping tool not working issue by running the Windows Update Troubleshooter. To do so, follow the below instructions.
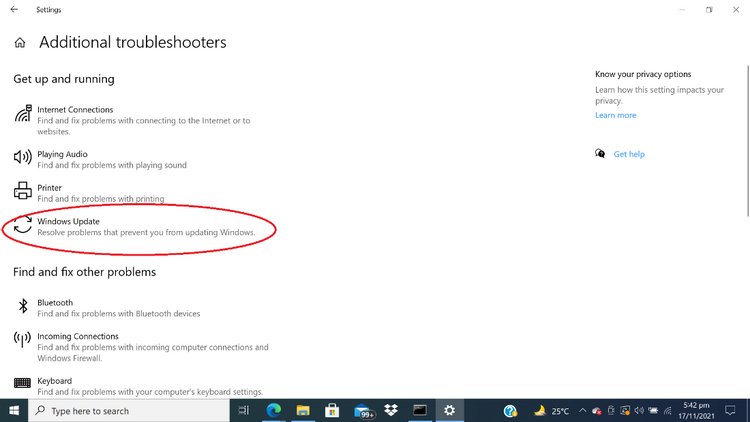
1. Open the Settings menu by tapping Win + I together.
2. Select Update and Security. Following that, go to Troubleshoot from the panel on the left side, then select Additional Troubleshooters.
3. Now, select Windows Update Troubleshooter.
![fix windows snipping tool not working]()
Method 5. Disable Automatic Time Temporarily and Reset Its Manual Value
You can also turn to Microsoft Tech Community to settle the Snipping Tool error. It's likely that you are facing a wrong date/time issue concerned with the app's digital certificates if your Snipping Tool app fails to work and is unable to grab screenshots.
In this case, you may want to temporarily alter your date and time from automatic to manual and switch back to automatic once the error is fixed. Here's how to do that.
1. Head over to Settings, click Time & Language, then select Date & Time.
2. Switch off the toggle of "Set time automatically."
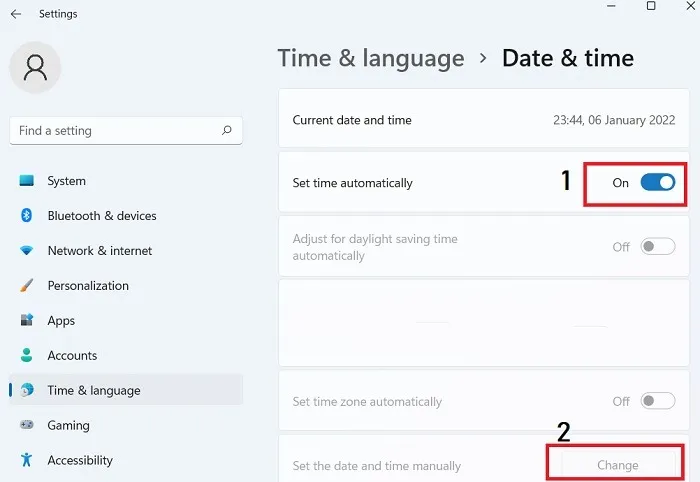
3. Go with the "Change" from the "Set the date and time manually" option, and change the date manually to October 30, 2022, irrespective of the current date.
4. Now, check whether the issue is tackled. If so, go back to automatic timing in "Set time automatically."
Method 6. Check Shortcut Key Properties
As there is an issue with shortcut keys at times, you can set new or change the shortcut keys to resolve the problem. To do so, follow the below steps.
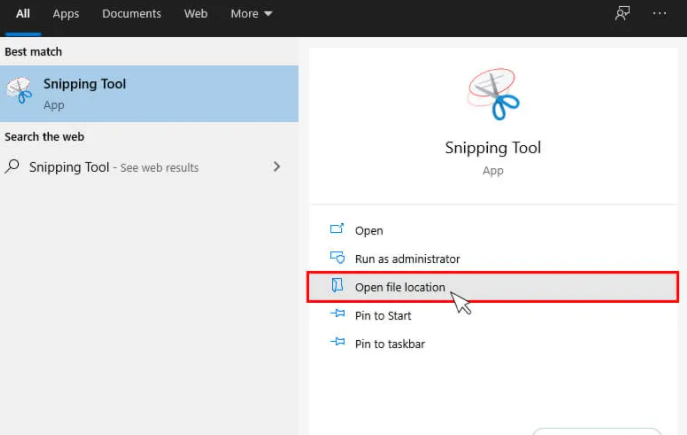
1. Search The "Snipping Tool" at the Start, right-click on it and select Open File Location. Upon that, right-tap on the "Snipping Tool" and select the "properties."
2. Alternatively, you can right-click on the Snipping Tool icon and select Properties from the desktop directly.
3. Now, click on the Shortcut tab and search for the shortcut key option.
4. Click on None and tap any key on your Keyboard, which will automatically set the shortcut key there. Note that you can't use Windows Key + S together since it is reserved for something else already.
5. Tap the Apply toggle and click OK to save the changes.
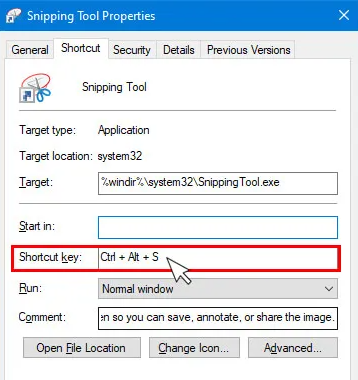
6. Close the properties window and press the shortcut key you have set to launch the "Snipping Tool." Check whether the problem still persists.
Final words:
The magnitude of the Snipping Tool can't be understated since it is associated with grabbing screenshots, which is a straightforward method to transmit data. Without it, you may get stuck in a lurch. Thankfully, all the methods mentioned above in this post have been examined already by experts. Just follow these practical ways to fix your windows snipping tool not working smoothly.