The duplicate command creates the same files in the original folder in a similar or nearest name with numerals added at the end. These duplicate files make when you download any file and save them to a new location or relocate any existing file from one folder to another. The reason is a lack of ignorance while performing the task. You must delete duplicate files, or else they will consume significant system storage and badly affect your PC speed. In this article, we will show the best four ways to find and delete duplicate files from your PC, and your device will return to its required space and pace simultaneously.
Let's move on!
4 Ways to Find and Delete Duplicate Files in Windows
It will be a time-consuming process if you go for a manual search and locate the duplicate files on your system. Nearly impossible that you can detect all the same files on your system. Let us tell you the best way to find and delete duplicate files from your PC storage.
Method 1: Use Easy Duplicate File Finder
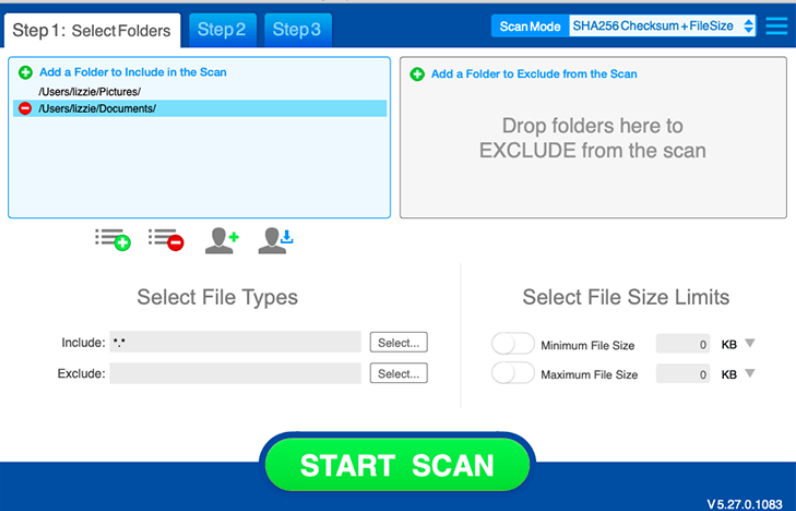
The best way to find and remove duplicate files is to take help from Easy Duplicate File Finder. The professional software can quickly scan and detect the identical file list based on the creation date. After the detection, you can keep the necessary folders and remove the unnecessary items from your PC. The powerful tool has innovative technology and intuitive scan modes that make your job easy and let your pc get back the lost space.
Pros
- It offers 10+ scan modes
- Can detect the duplicate file from cloud storage like Google Drive and Dropbox
- Wizard tool offers quick scan, detection and deletes duplicate files with the fastest speed
- It has Undo button for emergency recovery
Cons
- The interface is a bit old fashioned
- It's an expensive tool compared to others
Applicable Scenario/ users:
- Its powerful search engine enables fast and accurate scan
- It offers user-friendly remove duplicate files option
- The tool is suitable for the beginners
Price: Its single computer license charges $59.95/year.
Compatibility: Windows
How to find and delete the duplicate files?
Step 1. Set the Scan Mode
Launch the Easy Duplicate Finder and set it to scan the entire hard drive or SSD using File Search mode.
Step 2. Scan to Search for the Duplicate Files
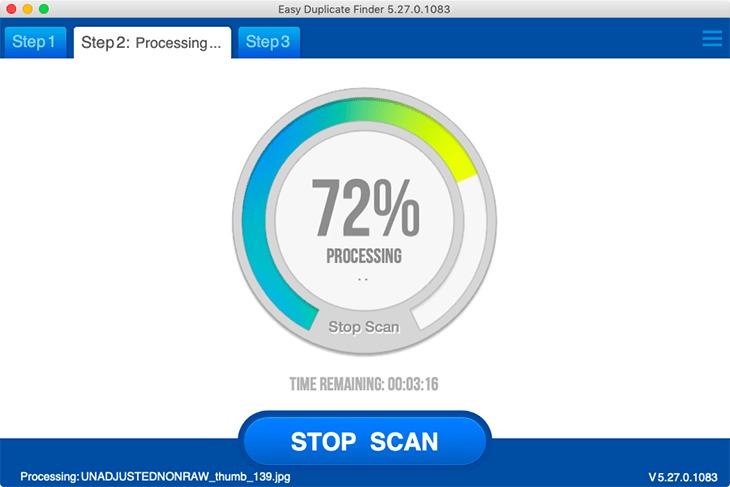
Wait for a few minutes to complete the scan. Depending on how many files you have on your computer, the Scan process could take a little while.
Step 3. Review Results
After the scan is complete, the identical files data will appear on the screen. Review the app’s results for identical files, including audio, video, documents and more.
Step 4. Remove Duplicate Files
Easy Duplicate Finder automatically suggests which files you should delete, you can click a button to automatically move duplicate files to the Trash or set file management preferences to delete only certain files.
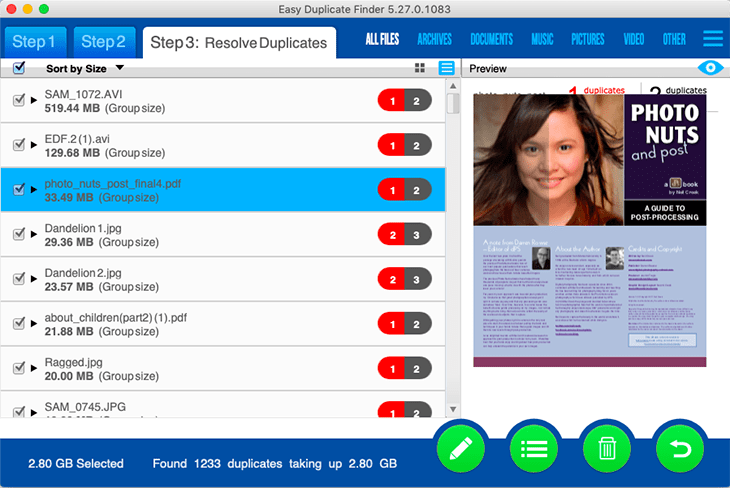
*If you accidentally delete a file that you didn't wish to, don't panic! Easy Duplicate Finder comes with a handy "Undo" feature, which will recover files that were mistakenly removed.
Method 2: Use Search Feature to Locate Duplicate Files
Windows Explorer has the functionality to search and locate duplicate files and folders. Windows Explorer provides a Preview pane through different viewing options, including oversized, extra-large, medium, small icons, details, content, etc.
Pros
- The feature is simple
- You can detect the file by name, icons, or other details
- You can catch the duplicate by Group
- You can delete them one by one after the detection
Cons
- Time- consuming process
- Difficult to sort out by name or icons, or category
Applicable scenario/user
- The best option for the users who don't want to install third-party software
- One by one or group deletion, the choice is yours
- This feature is applicable to detect and remove files and images, both
How to use the Search feature option?
Step 1: Open the Search Tools
Step 2: In the Search bar, type the name of the duplicate file ( you can search based on file size, icons, and other parameters to help Windows explorer)
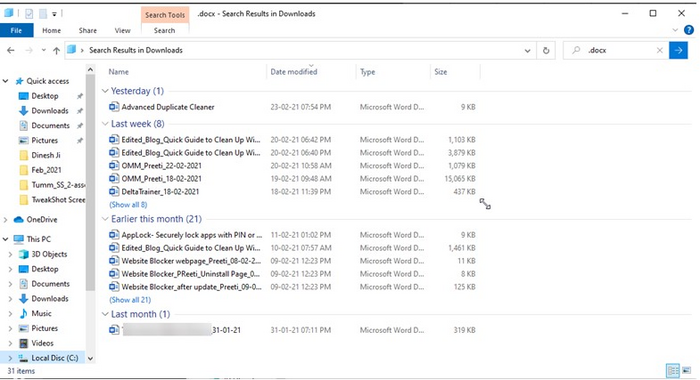
Step 3: If you know the extension or group name, type it here, and the search tools will display it on the screen
Step 4: Once you locate it, click on the Delete button
Once you delete it, the files will go to recycle bin. If you want permanent deletion, open the bin and click on the Empty Bin button to clear them permanently.
Method 3: Use CCleaner
Ccleaner is another duplicate finder software that performs the task with accuracy. The software helps you find duplicate files and delete them from your system without damaging the original files.
Pros
- Quick installation process
- It's an all-in-one powerful pc cleaning program
- It offers a customized scanning range
- User-friendly interface
Cons
- Bundle software will download automatically
- There's no Undo button
Applicable scenario/users
- An all-in-one tool to perform your PC cleaner
- Beginners can manage and operate the software easily
- A helpful tool that offers multiple functionalities for its users
How to use CCleaner?
Step 1: Install CCleaner on your PC and run the program.
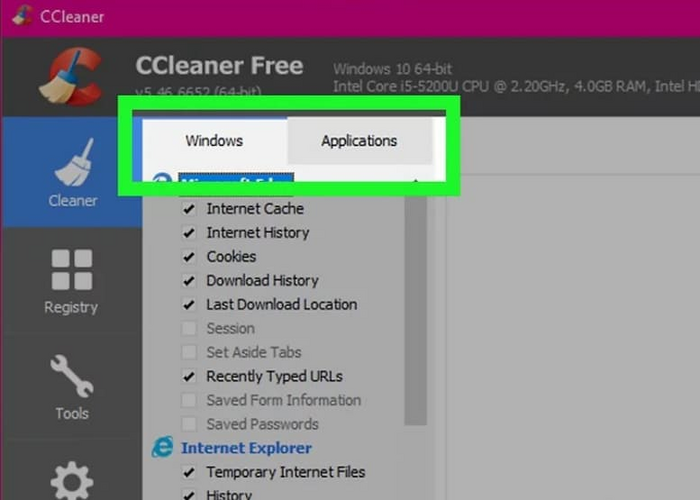
Step 2: The tool will ask to select the scan from Windows or Application. Based on your requirement, click on one tab.
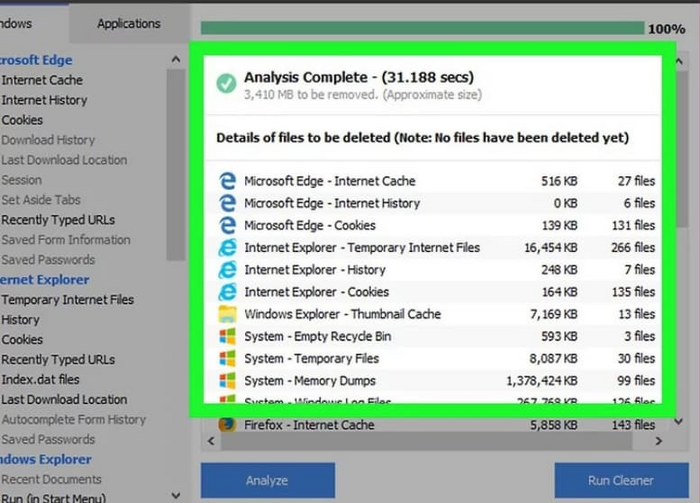
Step 3: Hit the Analyze button from the bottom and allow the software to begin the scan. A quick mode will show you the scan results in detail.
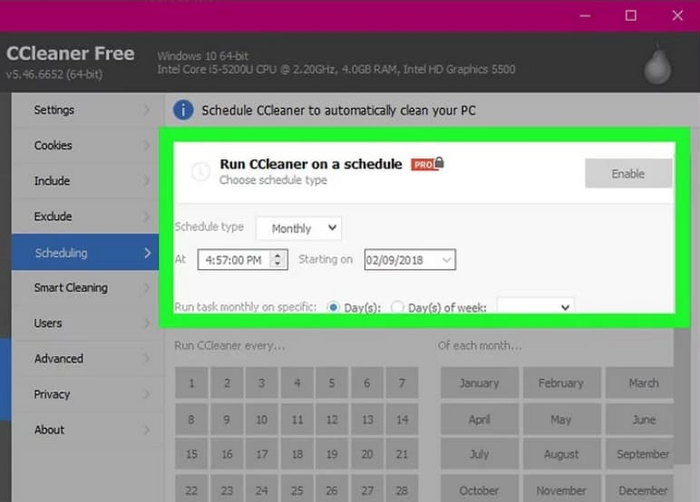
Step 4: Tap on the Run Cleaner button from the bottom of the screen, click on Continue in the following pop-up message and allow CCleaner to delete the duplicate files.
Method 4: Use Explorer Details Pane to Detect Duplicate Files
Windows don't have the feature to detect duplicate files and remove them, but the technique exists in File Explorer. If you're not interested in downloading any third-party app and only want Windows to perform the task, let's take help from File Explorer. You can sort out the issue within a few simple and easy steps.
Pros
- It's Windows' built-in feature
- Reliable app
- User-friendly system utilities
- It offers many other advantages
Cons
- Cannot perform advanced search and delete the duplicate files
- There's no search option for Group, you need to search one by one
Applicable scenario/users
- Good start for the beginners
- Can perform easy and simple tasks
- Helpful in organizing all your files and folders
How to use File Explorer?
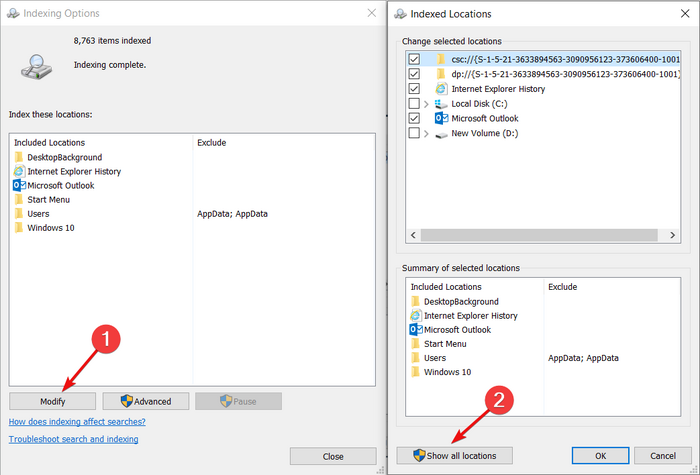
Step 1: Click the Start button, type Indexing Options, and tap on the app.
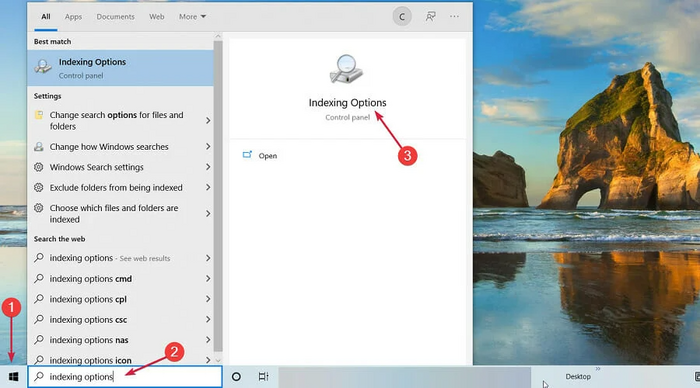
Step 2: Tap on Modify and press the Show all locations button in the next Window.
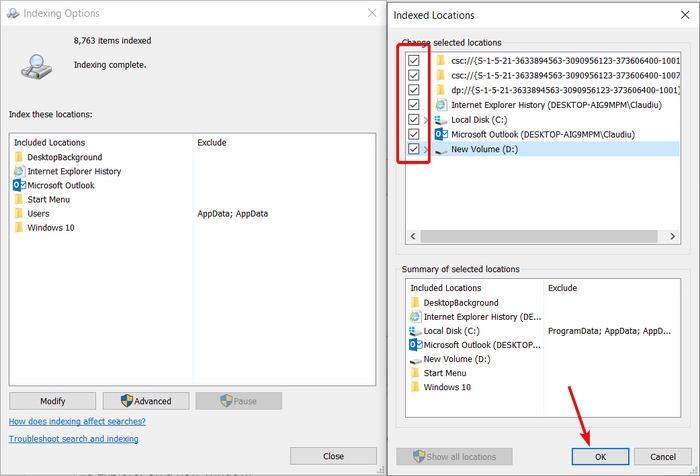
Step 3: Check all the boxes and tap on the Ok button
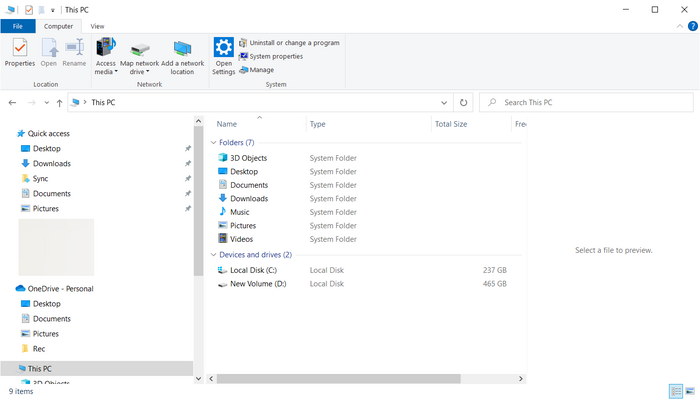
Step 4: Click on the Windows key +E to start File Explorer.
Step 5: Visit the user profile from the below location
This PC \ Local disk C: \ Users
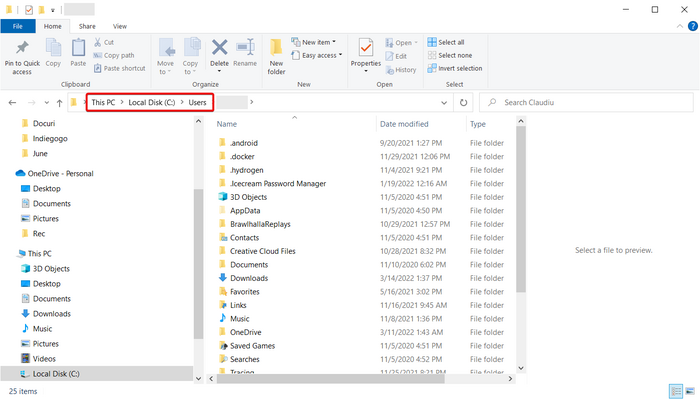
Step 6: Here, you have to go through a few adjustments to sort out the files
- Tap on the View menu, choose the Preview pane
- In the Layout section, select Details
- In the end, check the Current View tab, tap on Group by, and Select Name next; check Ascending
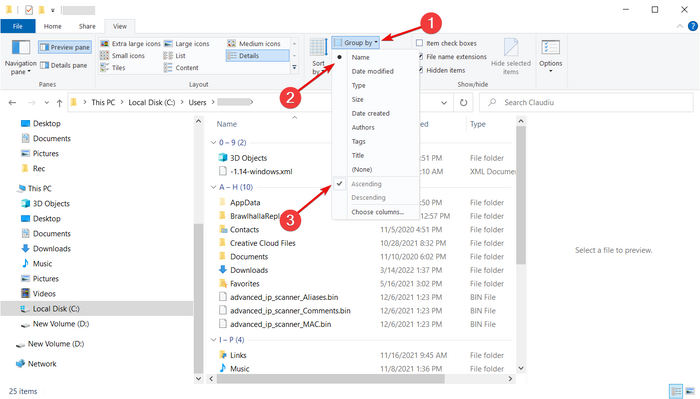
Step 7: You've prepared the File Explorer window; now, you can check the duplicate files by typing the extension of the files you're looking for in the Search tab.
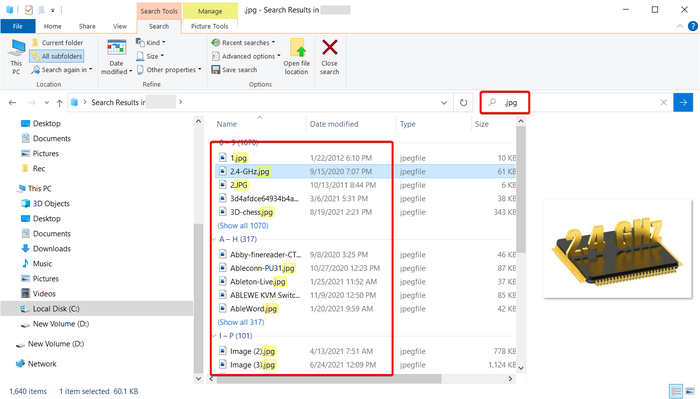
Step 8: Prepare a file extension table based on the file name and date. If you find a file duplicate from the table, hit the Delete button.
The Bottom Line
Delete duplicate files could be the wisest decision if you want your PC would run at its faster speed, and you get adequate space to store essential documents. We have summarized four ways to find and delete duplicate files from your computer. The manual process will make you sit for a long time to detect and remove duplicate files one by one. But if you want a hassle-free procedure, install Easy Duplicate File Finder, let the tool perform the task, and delete all duplicate files from your PC.
Price: Its single computer license charges $59.95/year.
Compatibility: Windows


